Piece for choir and live looping by Scot Hanna-Weir. Electronics by Bruno T. Ruviaro.
About this piece
Il Bianco e Dolce Cigno... e Dolce Cigno... is a composition for choir and live looping based on Jacques Arcadelt's madrigal Il Bianco e Dolce Cigno. The voices of the choir are recorded and played back live, in effect creating a second, virtual choir accompanying the real choir. One electronic musician triggers the electronic parts from a MIDI keyboard, following the score. Scot Hanna-Weir created the concept and composed the full score. Bruno Ruviaro realized the electronics. First performance was on January 29, 2015, at Santa Clara University. Scot conducted the SCU Chamber Singers, and Bruno performed the electronic part.
About this piece
This is a composition for choir and live looping based on Jacques Arcadelt's madrigal Il Bianco e Dolce Cigno. The voices of the choir are recorded and played back live, in effect creating a second, virtual choir accompanying the real choir. One electronic musician triggers the electronic parts from a MIDI keyboard, following the score. Care should be taken in correctly balancing the timbre and volume of the recorded choir to match the live choir as closely as possible. In an ideal sound setup, the two ensembles would be virtually indistinguishable.
Check out the score (PDF here).
Check out this video recording:
This page provides all the information needed to perform this piece. Score and electronic files are released under a XYZABC license ... ?
Equipment
The list below specifies what electronic equipment is needed to perform the piece. SuperCollider, the software used for recording and playback, runs on all major platforms (Mac, Windows, Linux).
- 8 cardioid condenser microphones
- 1 eight-channel audio interface
- 1 laptop running SuperCollider
- 1 USB MIDI keyboard controller (with at least 2 octaves and 2 faders or knobs)
- 1 small mixer
- 2 main loudspeakers (minimum)
- 2 monitor speakers for choir
These are the brands and models we used in concert (Winter 2015): PreSonus 1818 VSL USB Audio Interface; Dell laptop running Ubuntu Linux 14.04 and SuperCollider 3.6.6; Alesis Q25 MIDI Keyboard; Mackie Mixer 1202-VLZ3; three pairs of QSC K10 loudspeakers (one pair as monitors for choir, two stereo pairs as main PA system).
You don't need to have the exact same equipment to run the piece; any good quality equivalent gear should work.
How to run the piece (overview)
Once everything is connected and working, the electronic musician follows these simple steps in order to perform the piece:
- Open the SuperCollider IDE
- Open the file Il-Bianco-Player.scd
- Run it line by line (place cursor on a line, hit Control+Enter, move to next line, etc.)
- Play the piece on the MIDI keyboard (electronic part has its own staff in the score).
Note: if using SuperCollider on a Mac, use Command+Enter instead of Control+Enter to evaluate the code.
There is no need to open any other SuperCollider files or change any of the code. The only exception, to be done in advance, is the one-time mapping of your MIDI controller, as explained in the MIDI section later on this page.
Hardware connections
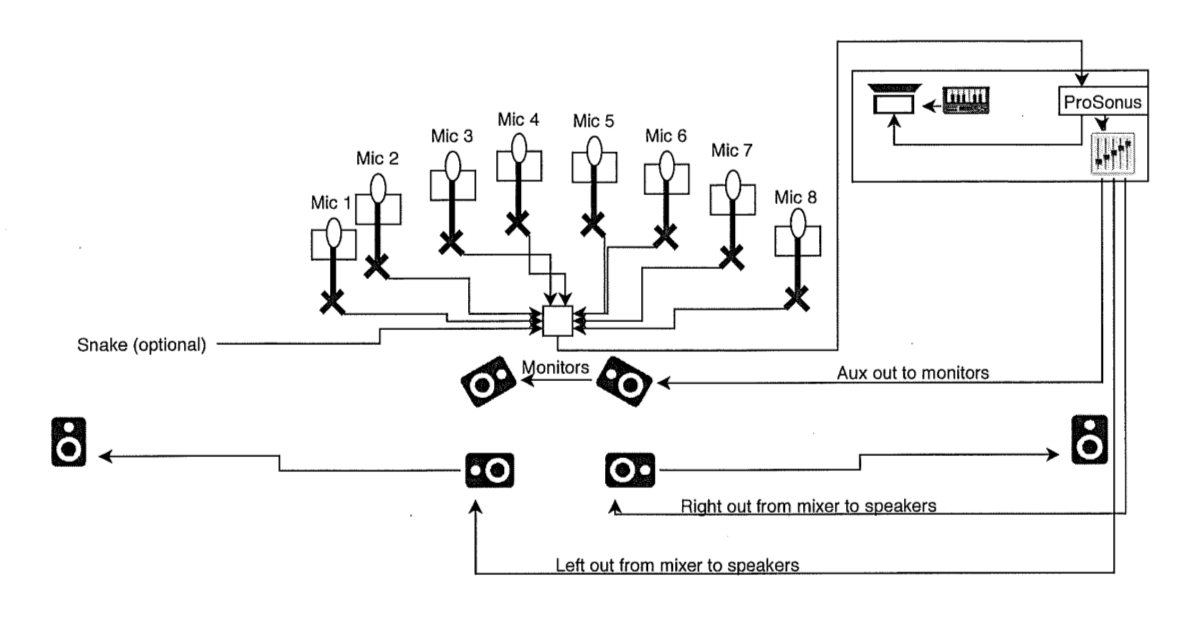
Hardware connections are as follows:
Condenser microphones are placed on mic stands forming a semi-circle. Mic cables connect into audio inputs of USB audio interface (phantom power needed).
Audio interface connected to computer via USB.
MIDI keyboard connected to computer via USB.
Audio interface stereo output connected to mixer.
Mixer main outs connected to loudspeakers.
Mixer aux send connected to monitor speakers for the choir.
In the premiere of this piece we actually used four loudspeakers for the audience: a stereo pair right in front of the conductor, and a mirror stereo pair placed on the far left and far right of the stage. In practice, while the diagram below shows the mixer on the table on stage with the performers, it may be easier to monitor levels by having an additonal person manage the mixer from the house.
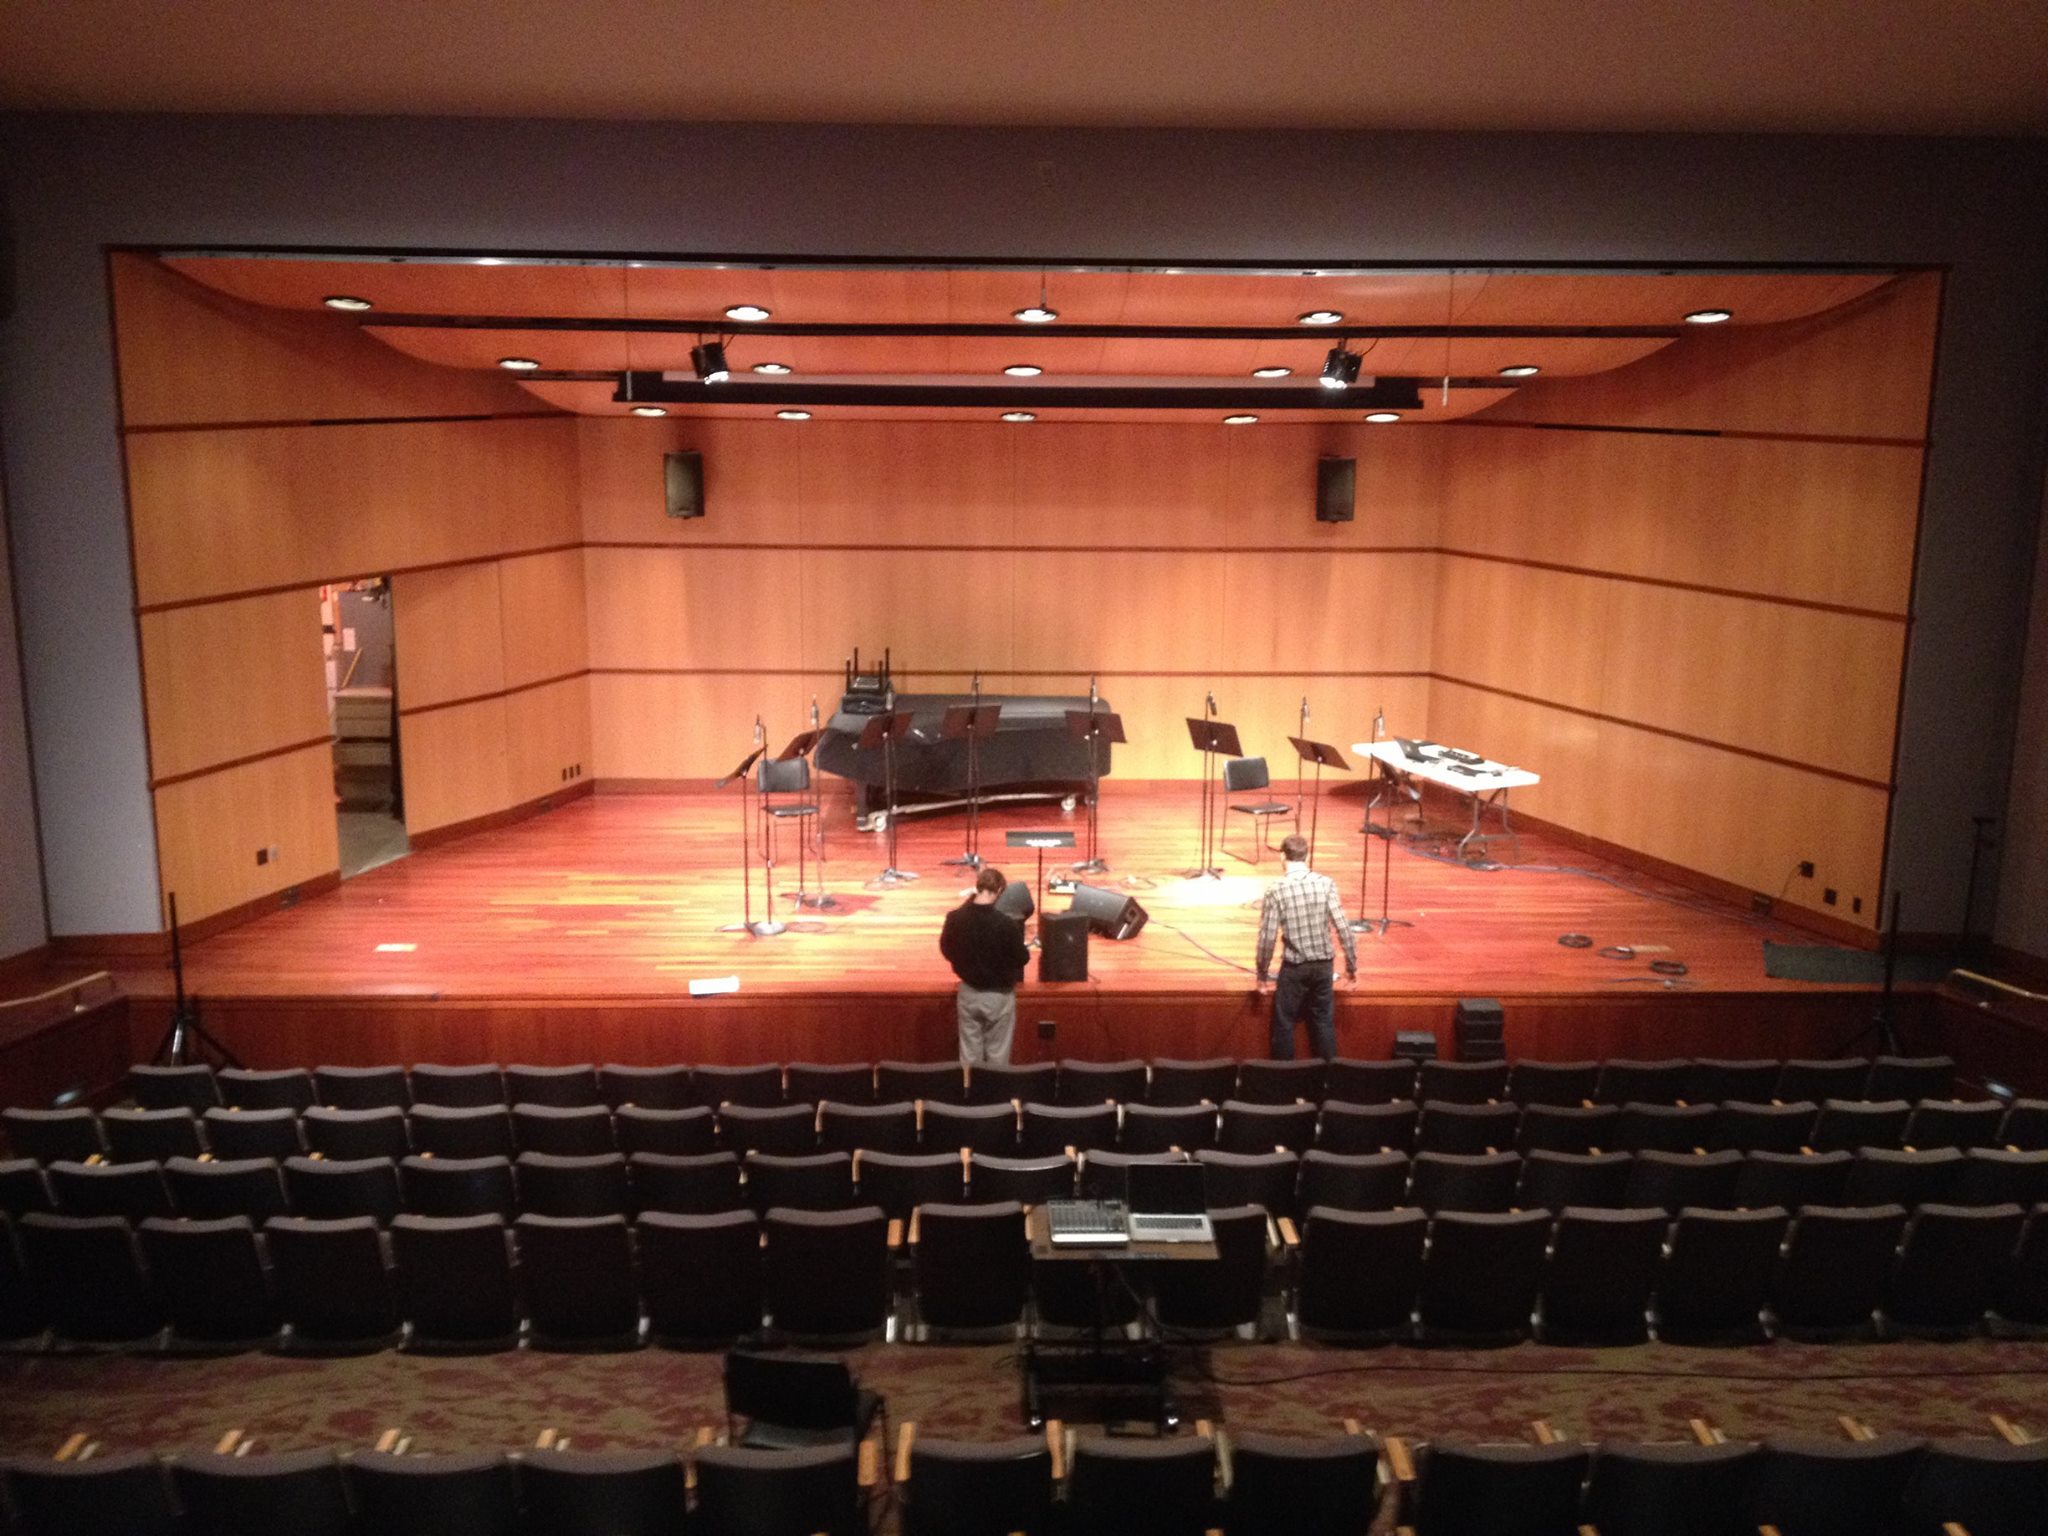
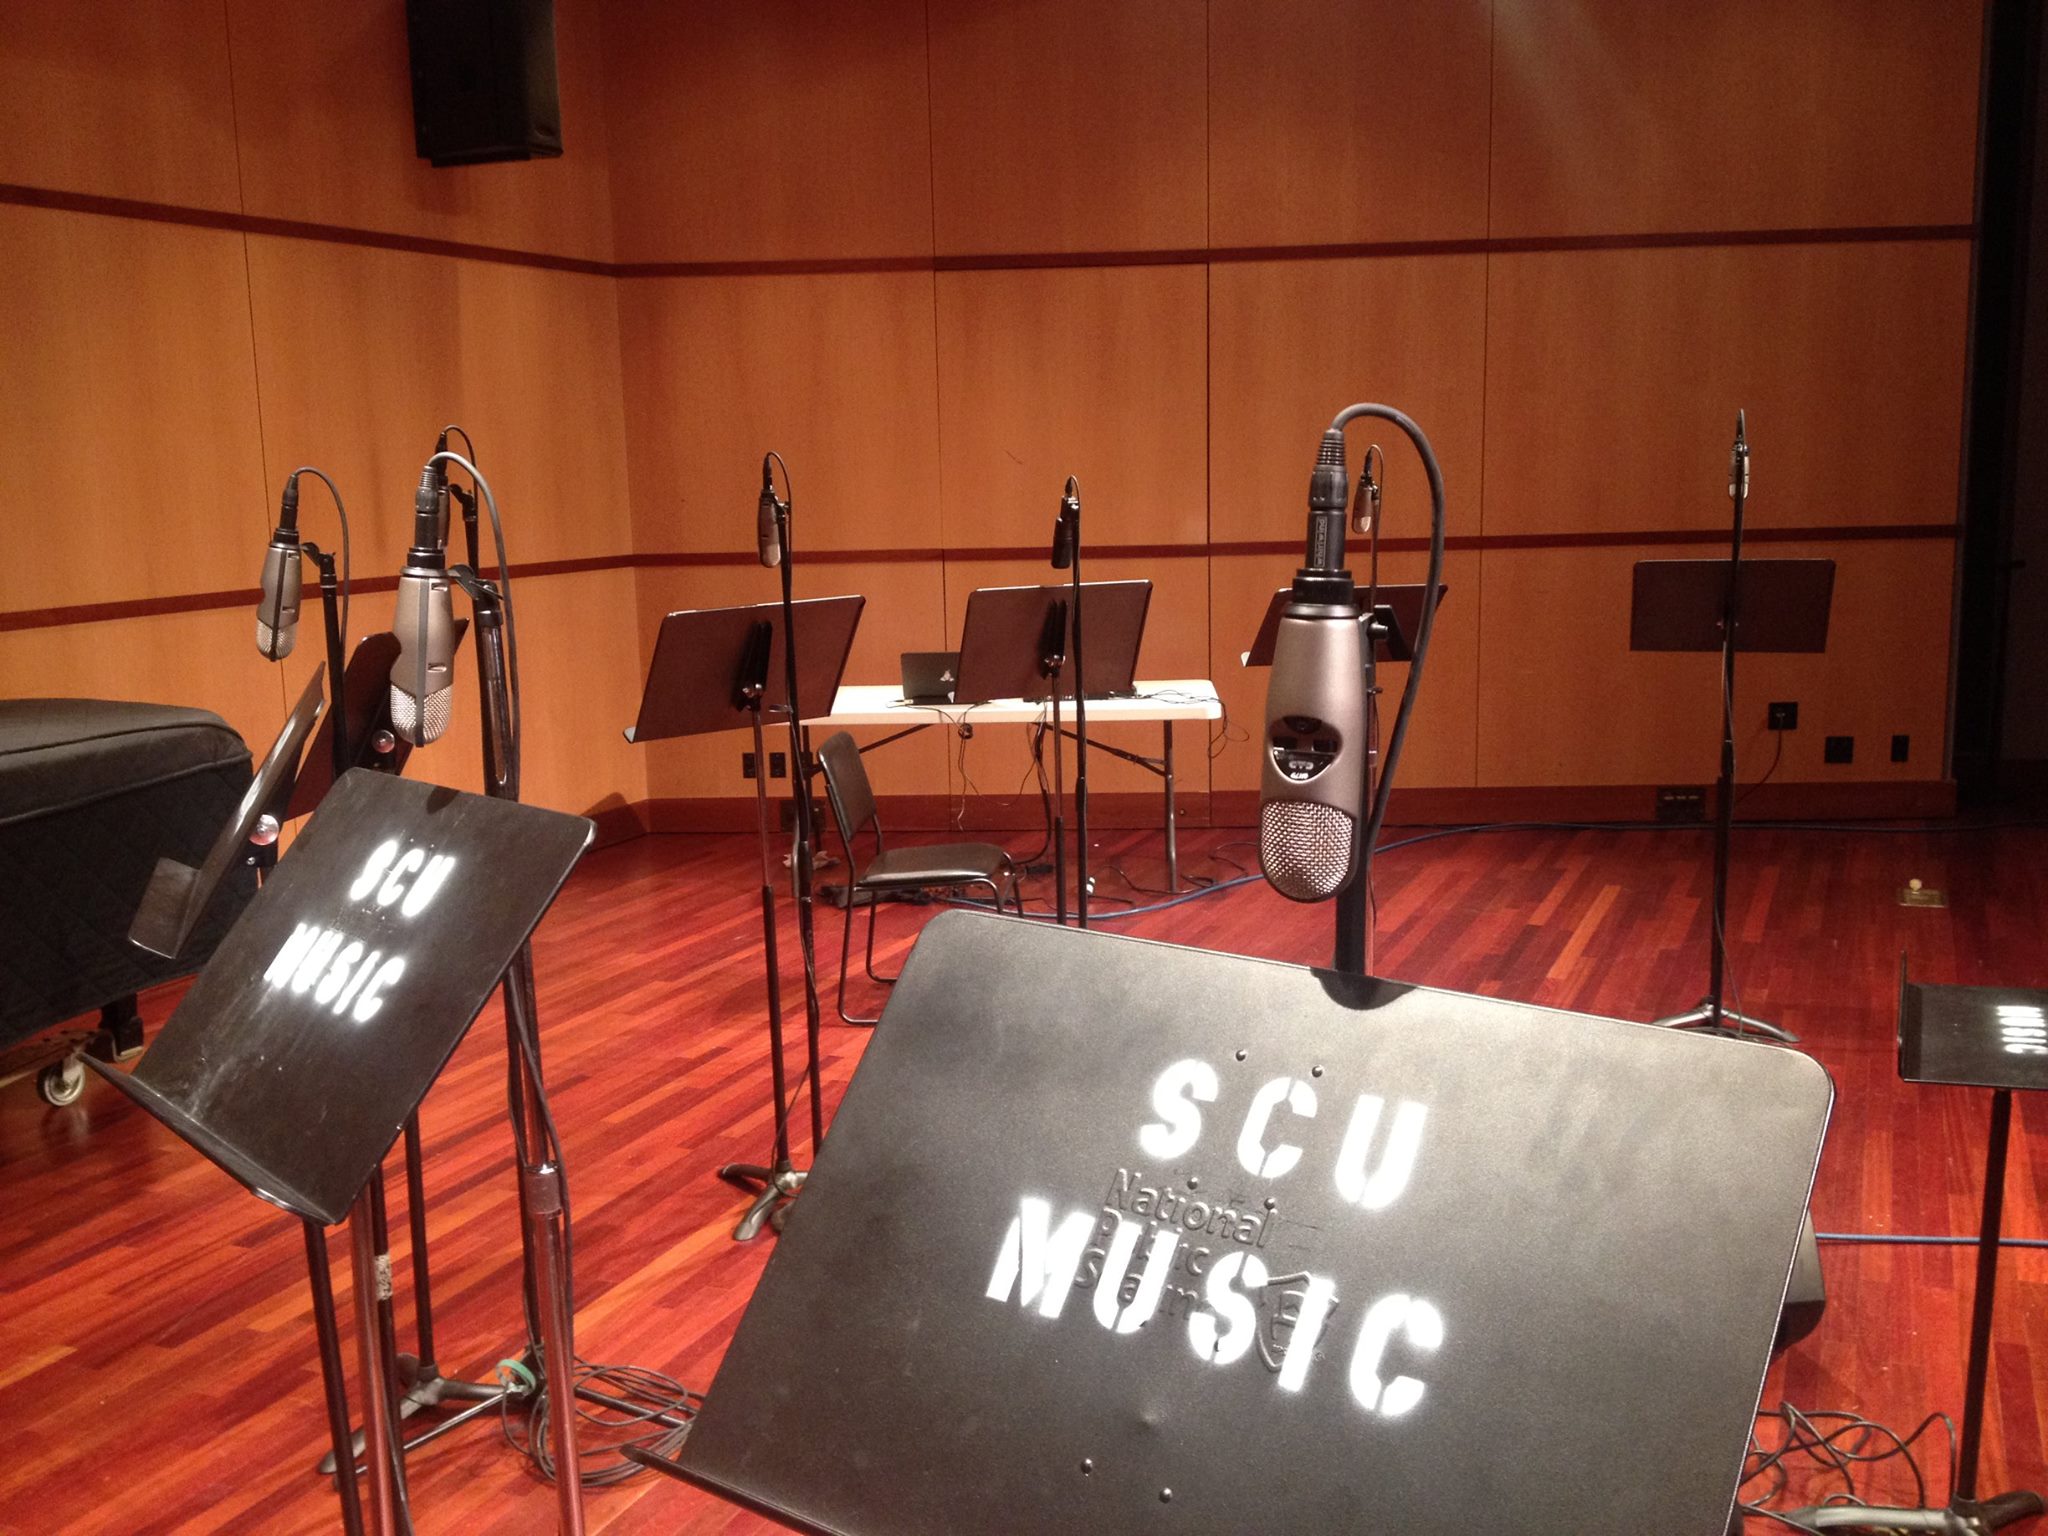
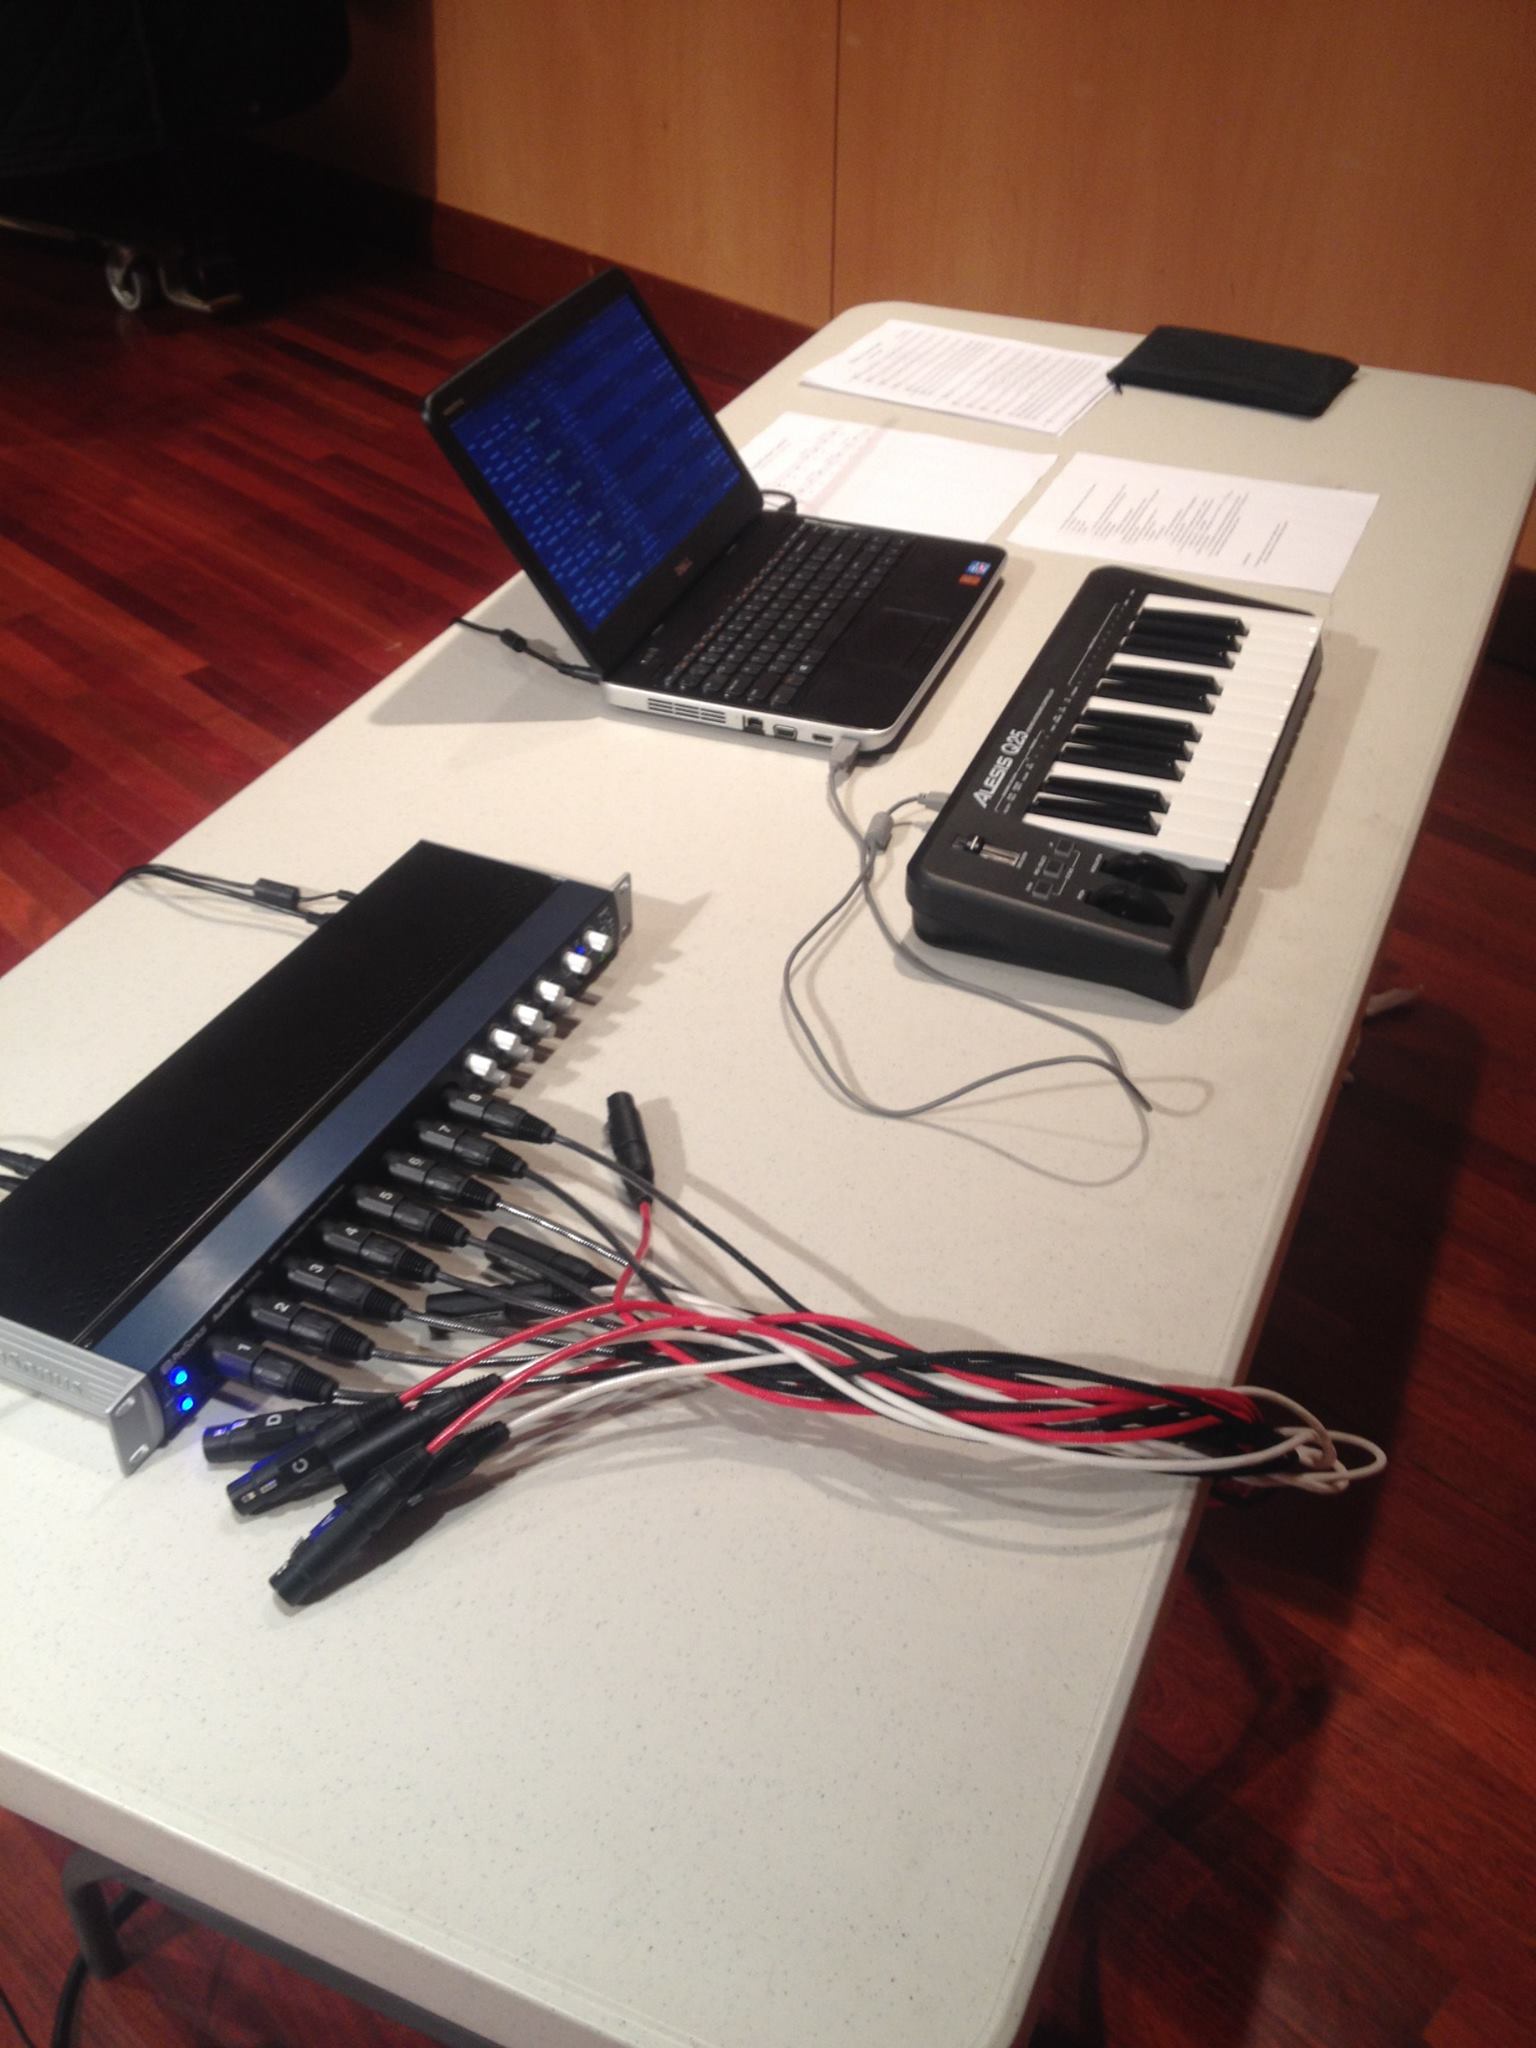
Here are some pictures of the set-up (loudspeakers were not yet in place):
MIDI keyboard
You need a standard MIDI keyboard with at least two octaves available, and with a couple of faders or knobs.
This section assumes the electronic musician will have common knowledge of MIDI. The only action required is to customize the Il-Bianco-MIDI.scd file with the correct control numbers assigned to your faders (or knobs), as explained in the CC mapping section below.
Midinote mapping (piano keyboard)
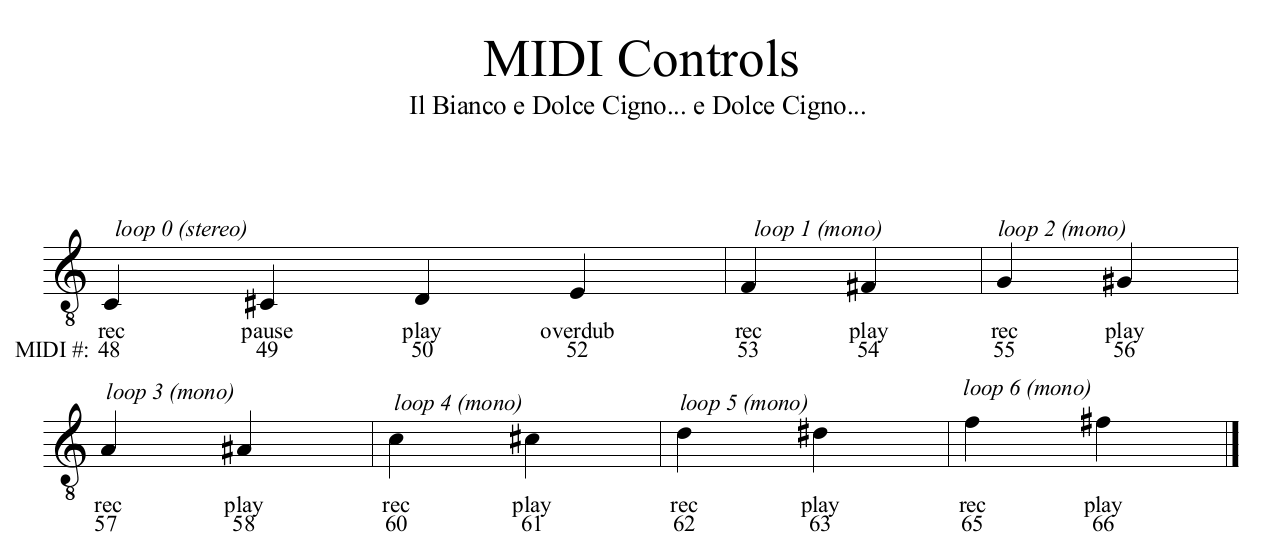
The piece uses midinotes between 48 (C3) and 66 (F#4) to trigger loop recording and playback. MIDI notes between 67 and 72 can be used for silent MIDI testing just before performance.
CC mapping (faders/knobs)
In addition, your MIDI keyboard should have two knobs or faders available for volume control.
One of your faders/knobs (called stereoLoopOutVolume in the code) will control the playback volume of all playback events except for the aleatoric section starting in m. 69. The other fader/knob (called monoLoopOutVolume) will control the playback volume of the loops in the aleatoric section (mm. 69-86).
You will need to find out the CC numbers of the two faders/knobs you want to use, and change these numbers in the appropriate place in the code. Here's how:
- Use the file Il-Bianco-MIDI-Trace.scd to find out the Continuous Control Number (CC number) of each knob/fader available on your MIDI keyboard.
- Open the file Il-Bianco-MIDI.scd and change the relevant lines (line numbers 159 and 167) to reflect the CC numbers of the desired knob/faders.
- Save the file, and you are done.
For example, if you found out your faders are CC numbers 1 and 7, you would change the contents of lines 159 and 167 (the lines starting with the word ccNum:) to look like this:
// Stereo Loop master volume output:
MIDIdef.cc(\stereoLoopOutVolume, {arg val;
    ~stereoLoopMasterOutVolume.value = val/127;
    ["main volume", val].postln;
    },
    ccNum: 1;
);

// Mono Loops master volume output:
MIDIdef.cc(\monoLoopsOutVolume, {arg val;
    ~monoLoopsMasterOutVolume.value = val/127;
    ["aleatoric loops volume", val].postln;
    },
    ccNum: 7;
);
SuperCollider code: technical details
The sections below are simply for reference. No need to read any of this unless you want to understand the SuperCollider code, make any changes or tweaks, etc.
Mic routing
Simply plug microphones 1 through 8 into the eight inputs of the USB audio interface. SuperCollider will take care of the proper internal routing. The tables below are just for reference.
| Microphone | SuperCollider Input |
|---|---|
| Mic 1 (soprano 1) | SoundIn.ar(0) |
| Mic 2 (soprano 2) | SoundIn.ar(1) |
| Mic 3 (alto 1) | SoundIn.ar(2) |
| Mic 4 (alto 2) | SoundIn.ar(3) |
| Mic 5 (tenor 1) | SoundIn.ar(4) |
| Mic 6 (tenor 2) | SoundIn.ar(5) |
| Mic 7 (bass 1) | SoundIn.ar(6) |
| Mic 8 (bass 2) | SoundIn.ar(7) |
SuperCollider internal routing
| Input Bus | Loop(s) |
|---|---|
| SoundIn.ar(0) | feeds loop6 (mono), loop0 (left) |
| SoundIn.ar(1) | feeds loop6 (mono), loop0 (left) |
| SoundIn.ar(2) | feeds loop1 (mono), loop4 (mono), loop0 (left) |
| SoundIn.ar(3) | feeds loop1 (mono), loop4 (mono), loop0 (left) |
| SoundIn.ar(4) | feeds loop2 (mono), loop5 (mono), loop0 (right) |
| SoundIn.ar(5) | feeds loop2 (mono), loop5 (mono), loop0 (right) |
| SoundIn.ar(6) | feeds loop3 (mono), loop0 (right) |
| SoundIn.ar(7) | feeds loop3 (mono), loop0 (right) |
In other words:
loop0 and loop7 (stereo) receive sound from all microphones, panned evenly across the stereo field. Soprano mics to the left, bass mics to the right. Loop 7 is for overdub section (bar 52). Code:
Splay.ar(SoundIn.ar([0, 1, 2, 3, 4, 5, 6, 7]));
loop1 (mono) receives sound from altos (microphones 3 & 4):
Mix(SoundIn.ar([2, 3]);
loop2 (mono) receives sound from tenors (microphones 5 & 6):
Mix(SoundIn.ar([4, 5]);
loop3 (mono) receives sound from basses (microphones 7 & 8):
Mix(SoundIn.ar([6, 7]);
loop4 (mono) receives sound from altos again (microphones 3 & 4):
Mix(SoundIn.ar([2, 3]);
loop5 (mono) receives sound from tenors again (microphones 5 & 6):
Mix(SoundIn.ar([4, 5]);
loop6 (mono) receives sound from sopranos (microphones 1 & 2):
Mix(SoundIn.ar([0, 1]);