Levels are the volumes of each Track relative to the others.
If you can’t hear a bass line above the other instruments, the obvious choice would be to raise the bass line volume. Levels can be adjusted using the Fader in the Mixer Strip or in each Track, just below the Track name. The first step in Mixing is to listen to everything that has been recorded and adjust the levels of all Tracks so you can hear everything clearly, but in a manner that is appropriate for the song. For example, the vocal track is normally louder than the rhythm guitar because the voice is the focal point of the song.
Using the Fader
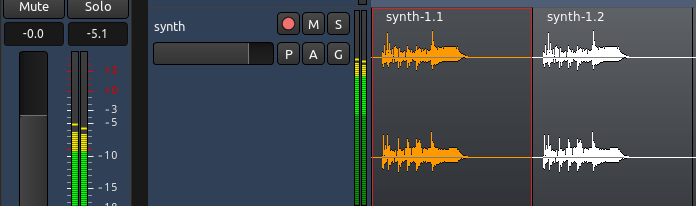
The Fader is the primary control of Levels for each Track. The exact value of the Track’s Levels are displayed in the small rectangular field above the Fader. You can change the Levels by either dragging the slider or typing in a new number directly into the rectangle with the number. By default the Fader is set to −0.0 dB, meaning that the Levels of the Track are not changed. In the screenshot below, the Fader for the track named “kick” is set to -0.0, and the Peak Meter indicates that the highest peak so far was -5.1.
Avoiding Clipping
One other important task in Mixing is to avoid Clipping. The Peak Value on the Mixer Strip turns red when the signal has peaked above 0.0dB. You can use this tool to monitor the highest Levels of your Track while Mixing.
In the screenshot below, the synth track has just clipped to +5.9. You can also see little red edges on the waveform itself, indicating the exact locations where the recorded sound clipped.
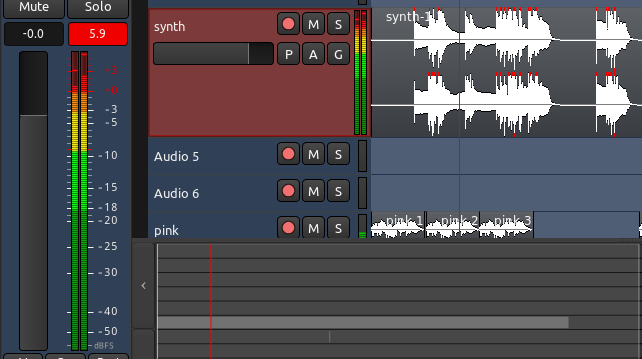
Click on the red number in the Peak Meter to reset it.
TIP: for the sake of the exercise, try to record your voice so that it clips. Hear how the playback is distorted.
You should make sure that anything that you send to your sound card or that you will eventually Export as a sound file (such as for CD mastering) never goes above 0.0dB to avoid actual Clipping.
If the clipping occurs in a very percussive sound and it is almost unnoticeable, you may be able to hide it by decreasing the gain (for example, Normalize the region to 0.0, or a lower number like -1.0). However, often the clipping results in audible distortion of the recorded sound. The best solution in this case is to just record again with lower levels.
Continuing
When you are finished with this chapter of the tutorial, you should have a collection of Tracks whose Levels are well adjusted to each other and do not Clip when added together in the Master Bus. Once this is accomplished, we can proceed to learn about Panning in the next chapter, so that our Mix takes on a strong feeling of Stereo space.
Next: PANNING