We have already learned a bit about the Select/Move and Range tools. In this chapter we will get an overview of all the Edit Modes and Cursor Modes available on that part of the Editor Window.
Edit Modes and Cursor Modes

These controls define the behavior of the main canvas and the different functions of the cursor.
The drop-down Edit Mode menu contains three options. Slide Edit is the standard mode, and the one we will be using in this tutorial. It allows you to freely drag regions around horizontally (within the same track) and vertically (between tracks). The other two options limit or block your ability to move regions from their positions, but we will not cover them in detail here.
Select/Move Object (shortcut “O”)

This Cursor Mode allows you to select or move objects such as regions and breakpoints (in an automation curve). When this Cursor Mode is selected, your cursor pointer will look like a little hand icon.
Range (shortcut “R”)

This Cursor Mode allows you to click and drag to define or resize Ranges. When this Cursor Mode is selected, your cursor pointer will look like a vertical line.
Zoom Range (shortcut “Z”)

This Cursor Mode provides a box which can be dragged around an area of the Main Canvas. When the mouse is released, the view of the Canvas will Zoom to that selection. When this Cursor Mode is selected, your cursor pointer will have the shape of a magnifying glass.
TIP: Note: there are other ways of zooming in and out. A handy shortcut is to use the “plus” and “minus” keys of your computer keyboard. Zooming will happen in relation to the Edit Point currently chosen (Mouse, Marker, or Playhead).
Draw Gain Automation (shortcut “G”)

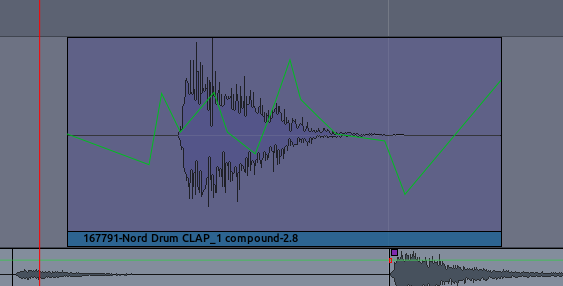
Use this Cursor Mode if you want to draw Region-specific volume Automation. The automation curve created this way will stick to the region on which it was created, even when the Region is moved around. This type of gain Automation is drawn directly on the Region itself, which makes it different from the Automation used in the drop-down Automation region (see chapter on Automation). When this Cursor Mode is selected, your cursor pointer will look like a cross.
Drawing Region-specific Gain Automation looks like this:
Stretch/Shrink Region (shortcut “T”)

This Cursor Mode allows you to drag and resize the duration of an entire Region without changing the Pitch. This is sometimes called ‘Time stretching’, hence the shortcut “T”. Please see the chapter on Stretching/Shrinking Regions for more details. When this Cursor Mode is selected, your cursor pointer will look like a diagonal arrow.
Listen to Specific Regions

This Cursor Mode allows you to click on any existing Region on any track and have it immediately played back. Playback stops at the end of the Region. When this Cursor Mode is selected, your cursor pointer will look like a small loudspeaker icon.
TIP: quickly audition a selected Region with the shortcut “H”.
MIDI Cursor Modes
The last two buttons you see after the Listen to Specific Regions button are related to MIDI operations, and will not be covered in this manual.
Continuing
In the following chapter, we will see how to take the Regions we have edited and Creating Looped Sections from them.
Next: CREATING LOOPED SECTIONS