One of the problems you may encounter in a Mix is that the loud parts are too loud, and/or the quiet parts are too quiet.
This kind of problem cannot be easily solved using Faders to adjust the Levels alone. You may set the Levels so high that they clip, or you may add unwanted background noise by simply turning Levels up. These are all problems with what is called the Dynamic Range, i.e., the difference between the loudest and quietest parts of your Session. There are several types of tools for adjusting the Dynamic Range available as Plugins within Ardour, including Limiting, Compression and Gating.
Limiting
A Limiter is a tool that prevents the volume of a Track from going over a certain Level, usually the Peak Level (0dB) or something close to it. Many Limiters have the option to boost the Levels of the incoming signal before they are Limited, and in this way you can “close the gap” between the loudest and quietest parts of your Mix. A Limiter can be used on the Master Bus to prevent the overall Mix from Clipping. Limiters are almost always used Post-Fader.
The “Fast Lookahead Limiter” can be found among the Plugins. To set how much the Fast Lookahead Limiter limits, simply adjust the “Limit (dB)” slider. The Fast Lookahead Limiter literally “looks ahead” in the signal by a few milliseconds, and when it sees that the signal is about to go over the limit you have set, it automatically turns the Levels down.
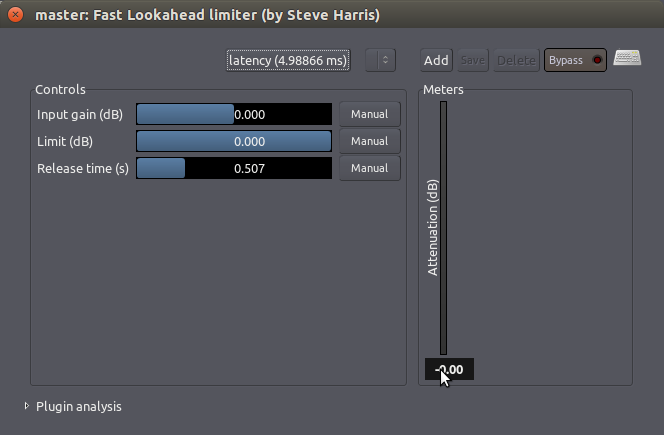
The “Input Gain (dB)” slider determines how much the Levels are increased before they reach the Limiter, and the “Attenuation (dB)” meter on the right-hand side shows how much the Levels are being reduced at any given moment. While the reduction in volume is nearly-instantaneous, the “Release time (s)” slider determines how long it takes the Limiter to return to 0 Decibels of Attenuation.
Note that the “harder” one drives the Limiter (by increasing the Input Gain and/or decreasing the maximum Peak Limit allowed), the more reduction the Limiter is forced to make, and the more likely it is that Artifacts of the processing will occur (such as Distortions or erratic changes in volume). On the Master Bus, it is generally best to avoid excessive Limiting.
Compression
A Compressor boosts the overall volume of a sound, but then “squeezes” it depending on how loud it is. This can make vocals sound more even or drums sound fuller and louder. The end effect is similar to how a Limiter can reduce the range between the quietest and the loudest sound, however the effect is more selective when using a Compressor.
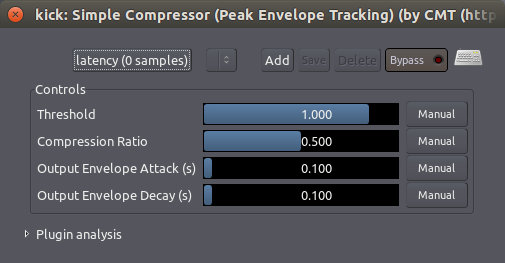
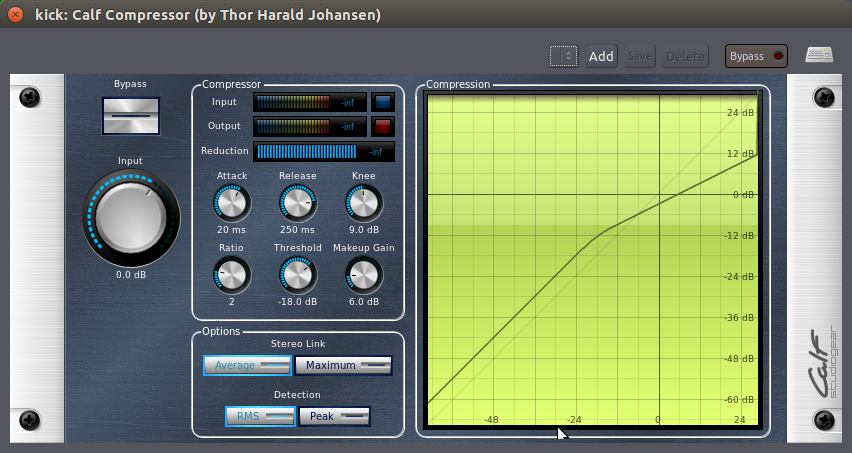
The simplest Compressor has relatively few controls, such as the “Simple Compressor” Plugin shown below. Here, the “Threshold” sets the Level at which the Compressor will start to act, and the “Compression Ratio” controls how much the Compressor will “squeeze” the sound. The “Attack” and “Decay” parameters control how quickly the Compressor affects the sound.
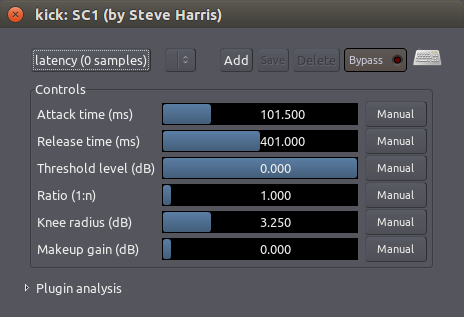
A more complex Compressor, the “SC1 Compressor” Plugin, is show below.
It has three main buttons:
-
“Threshold level (dB)” sets the level at which the Compressor will compress or squeeze the sound.
-
“Ratio (1:n)” controls how much it will squeeze when it reaches the threshold.
-
“Makeup gain (dB)” boosts the whole signal after the Compression occurs.
To soften out a vocal, for example, you could set a “Threshold level” of −10dB or so and a “Ratio” of 2.5, and then bring the volume back up with the “Makeup gain”.
The other three controls—”Attack time (ms)”, “Release time (ms)” and “Knee radius (dB)“—allow you to control the shape of the Compression.
For soft vocal Compression, you would want a semi-fast “Attack time” so that the Compressor catches the beginning of each word, a slower “Release time” to let the voice ring out, and a soft “Knee radius” to create a gentle form of compression that isn’t too noticeable.
If you want to make drums sound big, you might try a slow “Attack time” so that you don’t Compress the pop of the drum, a fast “Release time” so that the Compressor can catch the next hit of the drum, and a large “Ratio” to make the Dynamics between the beginning and end of the drum hit similar.
Below is a screenshot of a similar Compressor from the Calf Plugins Package:
Gating
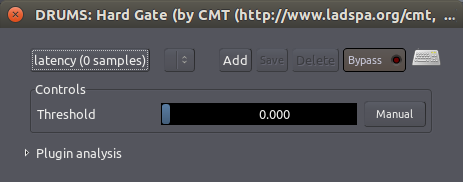
The simplest kind of Gate allows a signal to pass through when it is over a certain Level, and blocks the signal when it is lower than that.
Gates are often used as a kind of noise reduction. For example, the Gate on a microphone channel might only open while the singer is singing, preventing other background noises from coming through as well when she is not singing. Gated drums are also a very well-known studio production trick to make them sound “sharper”.
Here, the “Hard Gate” Plugin displays a single control parameter, the “Threshold” at which the Gate will open and let the signal through.
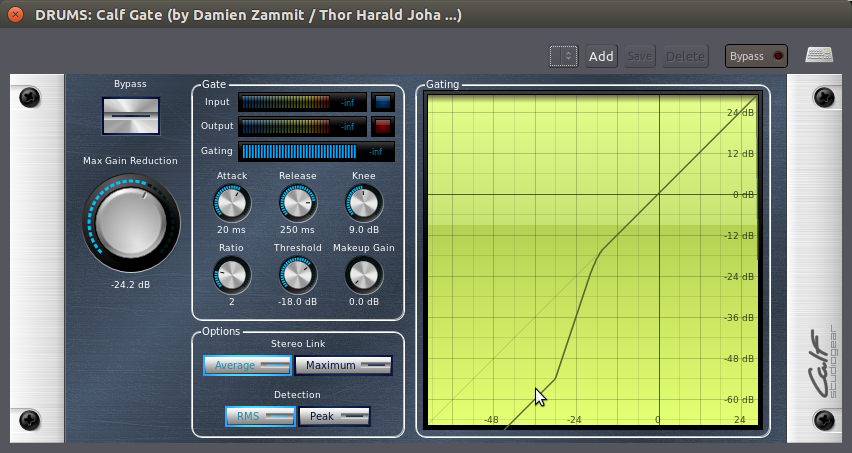
Other kinds of Gates, such as the Calf Gate Plugin, are more complex. They have independent control over how quickly the Gate opens (the “Attack”) and closes (the “Release”), as well as other parameters quite similar to those described for the SC Compressor above.
Continuing
Now that we’ve explored some tools for getting the Dynamic Range exactly where you want it, it’s time to look at adjusting the balance of Frequencies present in each individual Track and in your overall Mix. In the next chapter, we’ll learn how to use the Equalizer to do just that.
Next: EQUALIZING