Routing an audio signal is sending it from somewhere to somewhere else.
In addition to getting audio signals to and from Ardour, routing plays an important part inside Ardour itself. Examples of using routing inside Ardour include routing audio from Tracks to the Master Bus or to other Busses, creating ‘sends’, routing the outputs from Busses to the Master Bus, etc. (see chapter on Creating a Track for an explanation of Tracks and Busses). All routing, both internal and external to Ardour, is handled by JACK.
Routing in Ardour
The standard routing of inputs, tracks and busses in Ardour is determined when a new Session is created in the Advanced Options of the New Session dialog box (see Starting a Session chapter). By default, the routing is as follows:
- The audio device inputs are routed to the Track inputs.
- All outputs from Tracks and Busses are routed to the master bus inputs.
- The Master Bus outputs are routed to the audio device outputs.
Note that when a new Bus is created, nothing is routed to its input.
This routing setup makes sense for sessions containing only Tracks, but to make use of any Busses (other than the Master Bus) or to get creative with the paths of the audio signals inside Ardour, we need to be able to change the routing.
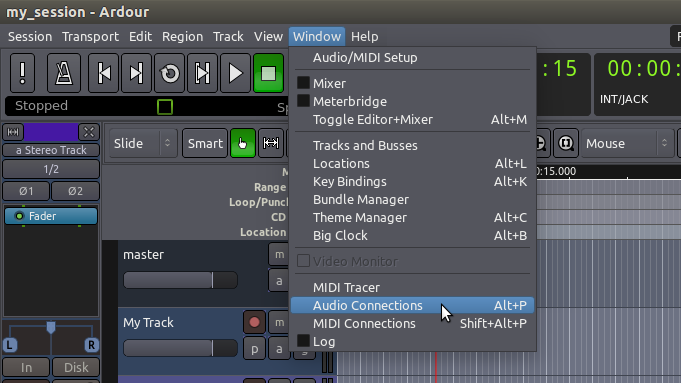
The Audio Connection Manager window (also known as the patchbay) is the main way to make connections to, from ,and within Ardour’s mixer. You can open this window with the shortcut “Alt” + “P”, or through the menu Window > Audio Connection Manager.
The patchbay presents two groups of ports; one set of sources, and one of destinations. Sources and destinations are organized by tabs. The available sources are displayed vertically on the left side, and the destinations are displayed horizontally at the bottom.
In the screenshot below, notice that the “Hardware” tab is selected on the top left (that’s a source), and the “Ardour Tracks” is selected as a destination in the bottom. This means that the matrix you see displays connections from available hardware sound sources (for example, a microphone), into existing Ardour tracks.
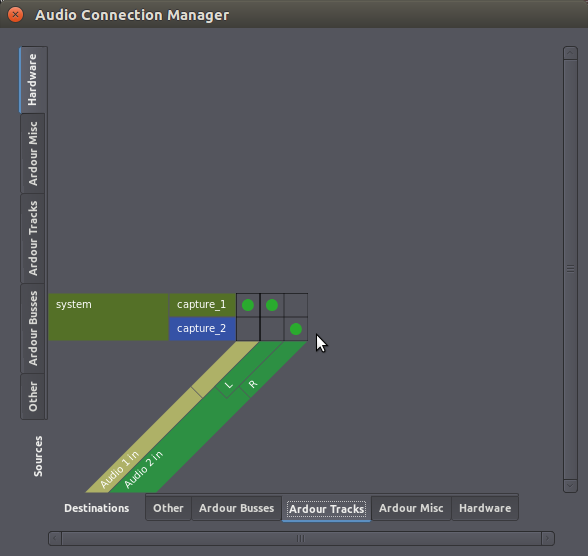
The green dots represent a connection. The screenshot above tells us that incoming sounds from “system: capture_1” (the first input source of your soundcard, or the built-in microphone of your laptop) are going into Ardour track named “Audio 1”, and also that incoming sounds from “system: capture_1” and “system: capture_2” are respectively going into the Left and Right inputs of Ardour track named “Audio 2.”
Notice we can see that “Audio 1” is a Mono track because it only has one connection slot, while track “Audio 2” is Stereo since it has two slots (Left and Right).
The next screenshot shows the signal path from Ardour Tracks (selected vertical tab) into Ardour Busses (selected horizontal tab). As mentioned earlier, the default setting for all Ardour Tracks is that their sound goes to the Master Bus.
Note: remember that “Audio 1” is a Mono track? We saw it in the earlier screenshot that “Audio 1” only has one input slot. But now on the screenshot above you see that “Audio 1” has two outputs (Left and Right). This is normal: we define whether a track is Mono or Stereo by its number of inputs, not outputs. Mono tracks will hold a single channel of audio, but you can still choose to place the sound on the left or the right speaker (or anywhere in between). More on this in the chapter Panning.
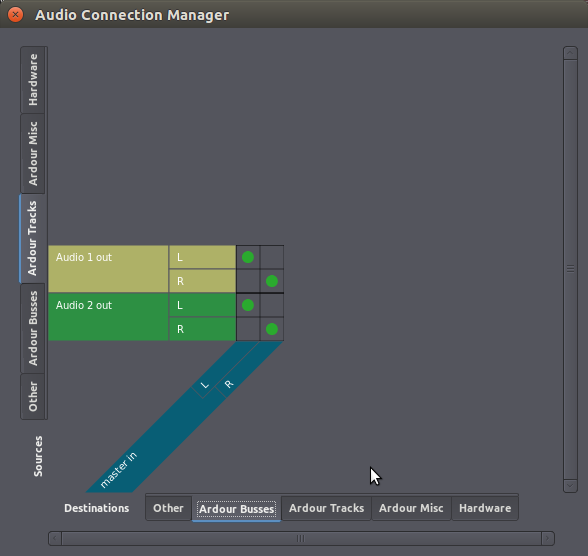
Finally, let’s explore a couple more tabs in the Audio Connection Manager to see the sound going from the Master Bus to the actual hardware outputs (your loudspeakers or headphones):

As you can see, the selected source tab is now “Ardour Busses”, and the destination tab is “Hardware”. This session happens to have only one bus, the default “master out”. The green dots show that all sounds coming out of the Master Bus are going to system playback 1 and 2, which are the outputs of your soundcard.
How to connect and disconnect?
To make a connection, click on the desired empty square in the matrix; a green dot will appear to indicate the connection is made.
To undo a connection, simply click on an existing green dot and it will disappear.
Practical example of routing to a bus
In the following example session, there are two guitar Tracks and one unused Bus called Guitar Bus, all Stereo.
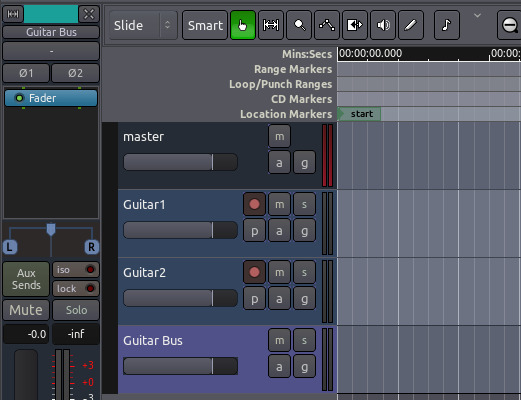
Suppose you want to send the output from the two guitar Tracks to the Guitar Bus instead of the Master Bus. This can be useful to control the volume of both guitars with just one Fader (in this case the Guitar Bus fader). Then the output of the Guitar Bus, which is the sum of the two guitars, goes directly to the Master Bus.
Here is how to edit the patchbay to get the desired routing. Select “Ardour Tracks” tab from Sources (vertical tabs), and “Ardour Busses” from destinations (horizontal bottom tabs). Undo existing connections from both Tracks to Master. Then create connections from both Tracks to Guitar Bus. The final result would look like this:
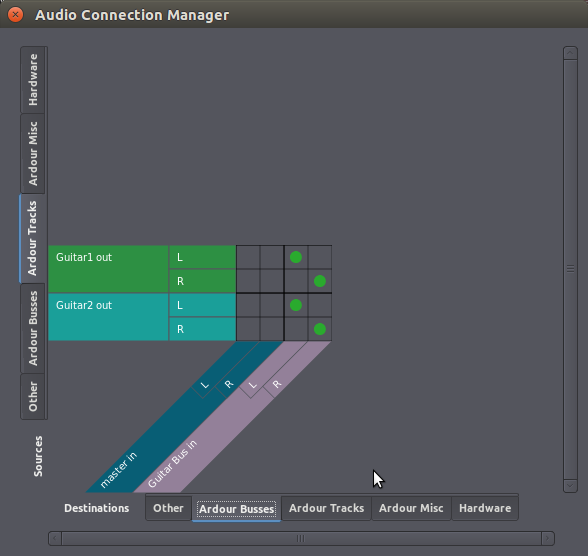
Now both guitar tracks are routed to the Guitar Bus, and no longer directly connected to the Master Bus. We then make sure that the Guitar Bus is, by its turn, routed to the Master Bus (the output routing of a Bus is edited in the same way as for a Track), so that we can still hear the sound from both guitar Tracks. Now we can control the volume of both guitar Tracks together by changing the Fader of the Guitar Bus. What’s more, we can now add Plugins to the Guitar Bus to process the sound of both guitar Tracks together.
Track- or Bus-specific views of the Patchbay
The Audio Connection Manager (Patchbay) that you open with “Alt” + “P” shows you the complete matrix of every single source and every single destination available in Ardour. Sometimes this is too much: you just want to quickly change the routing of a single track input or output, for example. Ardour allows you to view only a relevant subset of the Patchbay when you click directly on the Inputs or Outputs button of a Track or Bus in the Mixer Strip.

The Inputs button is at the top, and the Outputs button is on the bottom of the strip. Clicking on either one will show you a smaller Patchbay with only the Inputs or Outputs of the selected Track or Bus.
All Ardour connections are JACK connections
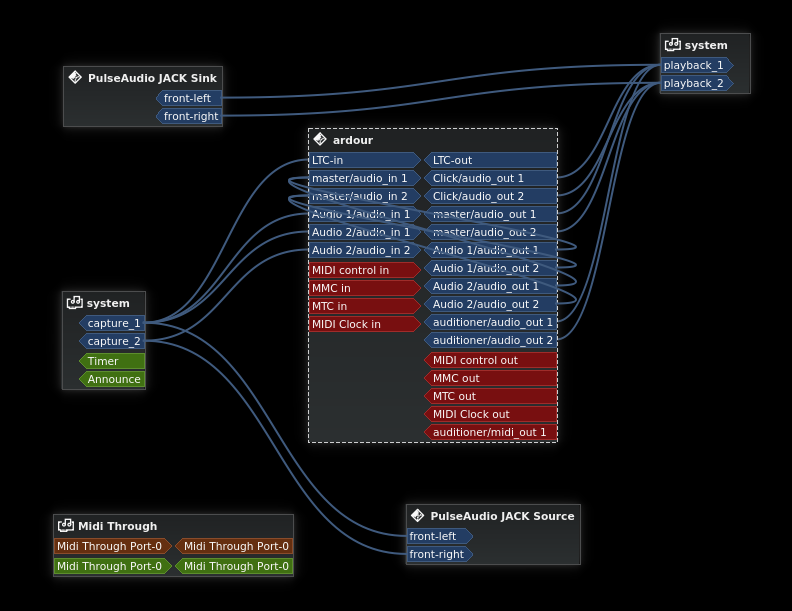
It is important to realize that any routings that you make or disconnect from within Ardour are in fact JACK routings, which you can see from other applications like Qjackctl, Catia, or JackPilot, depending on your Operational System. Below is an example of a Catia window (Linux only) displaying the same JACK connections discussed above:
Continuing
In this chapter, we covered how to manage Routing inside Ardour, or between Ardour and the sound card. However, one of the strengths of using the JACK system is that it can also manage connections between applications on the same computer. To gain a better understanding of how this works, please continue to the chapter Routing Between Applications. If you would prefer to work only with Ardour, then skip ahead to the section on Arranging Tracks.
Next: ROUTING BETWEEN APPLICATIONS or ARRANGING TRACKS