Automation is a way of dynamically changing audio processing parameters over time.
Up to now, we have used fixed values for various parameters of our Tracks (for example, a Track Fader set to -3.0 dB; or a Mono Panner set to 100% Left; etc.) These fixed values would apply for the entire Track throughout the whole Session.
But what if you would like these values to change over time in a pre-determined way? For example, you may want to have the Gain of a Track to gradually decrease over twenty seconds. Or you may want to make a sound move from Left to Right over two seconds.
This is accomplished with Automation. The Fader, Panning, and any of the parameters of the Plugins used in that Track can be automated. An automated parameter is displayed underneath the parent track in its own Automation Track. Automation data is visually represented as an Automation Line, made up of a number of Automation Points. Here’s how a track with Automation looks like:
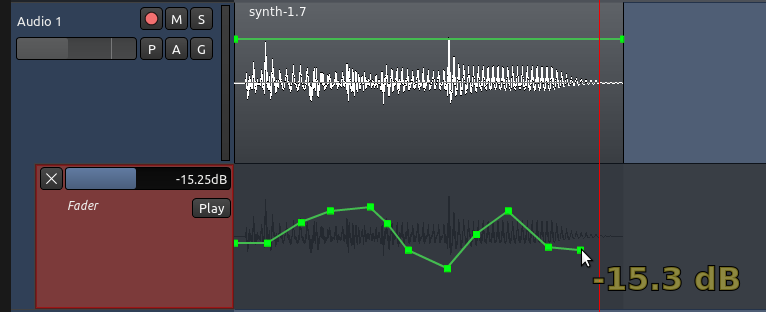
In the image above, the Automation Track called “Fader” is associated to the parent Track called “Audio 1”. The Automation Line controls Fader (volume) changes over time.
Creating a Fader Automation Line
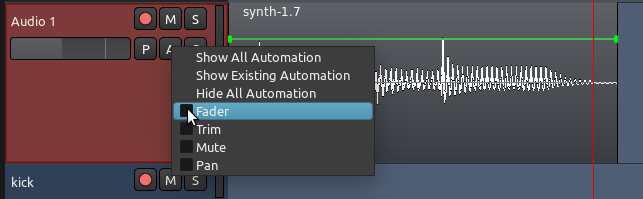
Let’s create a simple Fader Automation. Click the “A” button of a chosen track. A menu will appear, where you can select the parameter you would like to Automate. Choose “Fader”.
An Automation Track will then appear. Select the Draw Mode (shortcut “D”):

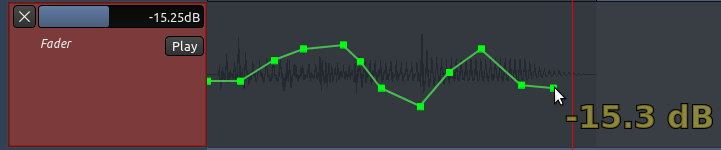
Now you can create Automation Points by clicking anywhere in the Automation Track. An Automation Line joins the Automation Points you add. The yellow number (-15.3 decibels in the image below) indicates the Gain level for the selected Automation Point.
Automation States
The Automation Curve will not play, however, until you set the Automation State to “Play”.
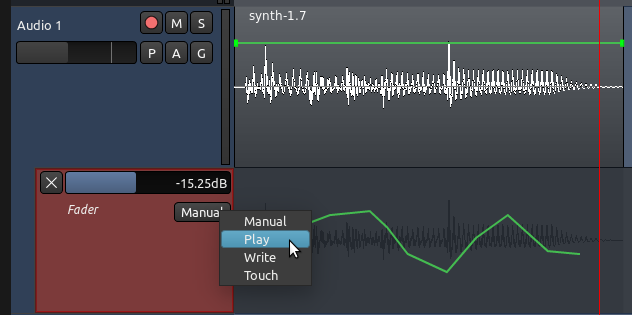
Manual: When set to “Manual”, the Track will ignore any Automation data. It will just play with whatever volume is the Fader is set to. In this mode, you are able to move the Track Fader by hand to set a new fixed level. That’s the default behavior of a Track when it’s first created.
Play: When set to “Play”, the Track will automatically change the Gain levels following the Automation Curve drawn in the Automation Track. You will no longer be able to move the Track Fader by hand. During playback, you will see the Track Fader moving up and down according to the curve.
Write mode will continuously record user changes to the Automated parameter as the Transport plays, creating an Automation Line. For instance, you may start playback and then make real-time changes in gain using the Fader of your Track. All the changes you make will be written (recorded) as an Automation Line, which then you can play back later by switching the Automation Mode back to Play
Touch mode is similar to Write mode. Unlike Write mode though, Touch mode won’t record over existing Automation data unless the parameter is being changed.
If these concepts are new to you, focus now on just the first two modes (Manual and Play), and practice creating automation by drawing Automation Curves by hand.
Creating a Plugin for Automation
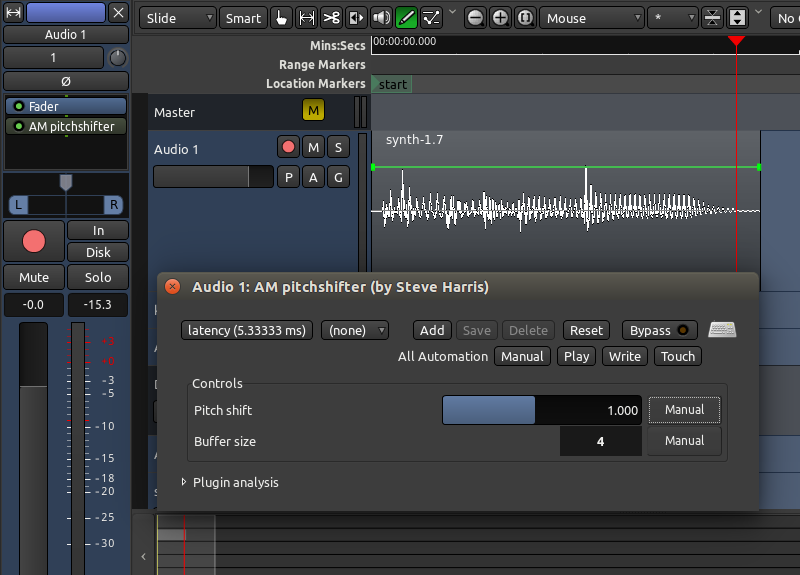
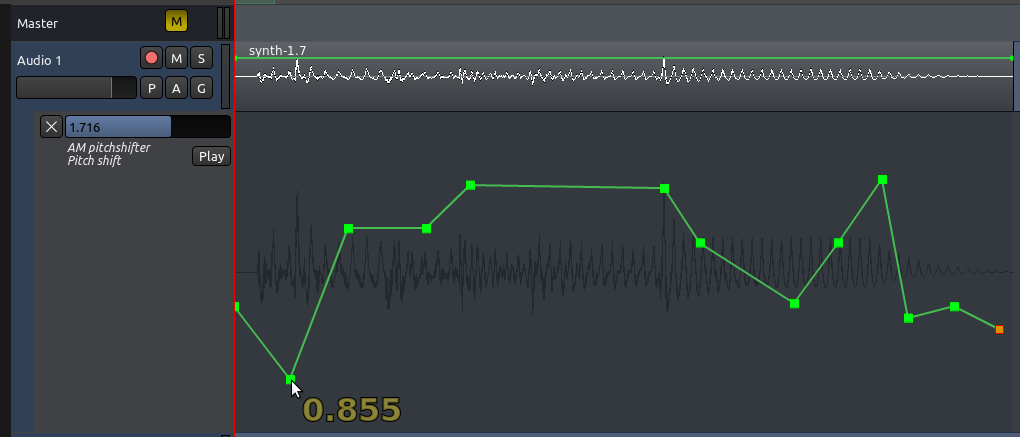
You may add Automation to any Plugin which has already been added to a Track. In the example below, we have a “AM pitchshifter” Plugin added to a track.
In order to select a Plugin parameter for Automation, click the button on the Track marked “a”. The menu will appear. Under “Processor Automation” you will find a listing of the Plugins you have added for that Track.
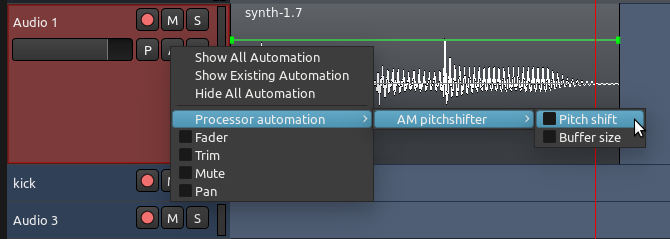
Within each listed Plugin, you may choose which parameter you want to Automate from a list. In the example, we chose the parameter “Pitch shift” of the Plugin “AM pitchshifter”. An Automation Track for that parameter appears. Note that as you open several Automation Tracks, they will appear one after the other below the main parent Track.
Draw an automation curve for that parameter. Don’t forget to set the Automation State to “Play”.
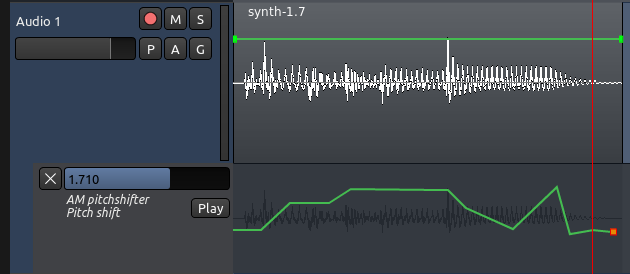
In the image above, the pitch shift of the sound is now changing over time, controlled by the curve.
TIP: You can hide an Automation Track by clicking on the “X” at the upper left corner of the Automation Track. Note that a hidden Automation Track continues to function even when it is not visible.
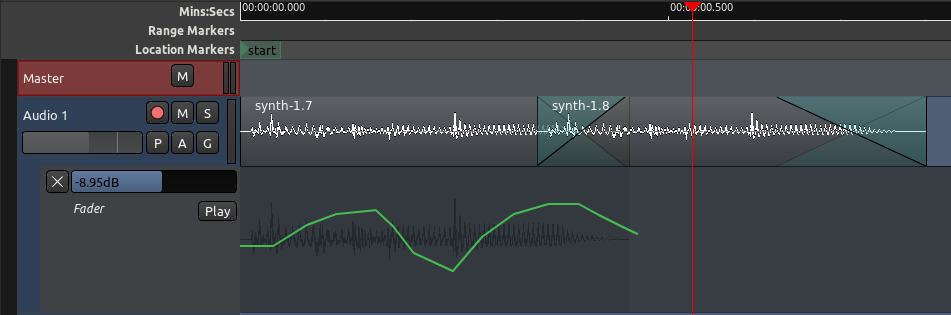
Adding Better Visual Resolution to Automation
You can achieve a greater amount of vertical precision by increasing the height of the Automation Track. Move your cursor near the lower edge of the Automation Track. The pointer turns into a vertical double arrow. Drag it down to increase the height of the Automation Track. Notice that the parent Track and the Automation Track heights are independent, so while working in your Automation Curves you might set them up like this:
TIP: Remember you can also Zoom In and Out to increase resolution in the horizontal axis.
Working with Automation Points
There are several ways ways of adjusting Automation Points, depending on the editing mode you are in:
-
An Automation Point can be dragged in any direction with the mouse (works in Grab, Draw, and Edit modes).
-
To remove an Automation Point, hold down the “Shift” key while Right-Clicking on it (works in Grab, Draw, and Edit modes).
-
Edit Mode only: any segment of the Automation Line between Automation Points may be dragged vertically, affecting both end points at once, without affecting their horizontal position. Simply click somewhere on the line between two points, and drag up and down.
-
How to delete multiple Automation Points at once (Grab Mode and Edit Mode only): select multiple Automation Points by dragging a box starting on the track background around the points. Then the selected points may be deleted by hitting “Delete” (not “Backspace”). If you are on a Mac and do not have a true “Delete” key, try “Function” + “Backspace”).
After an Automation Curve ends, its value will stay at that level for all subsequent regions, whether or not you have drawn a continuation of the curve.
In the example above, the last point of the curve is at -23 decibels. That same level will be kept for the remainder of the Track, even though the line is not drawn until the end.
Moving Automation
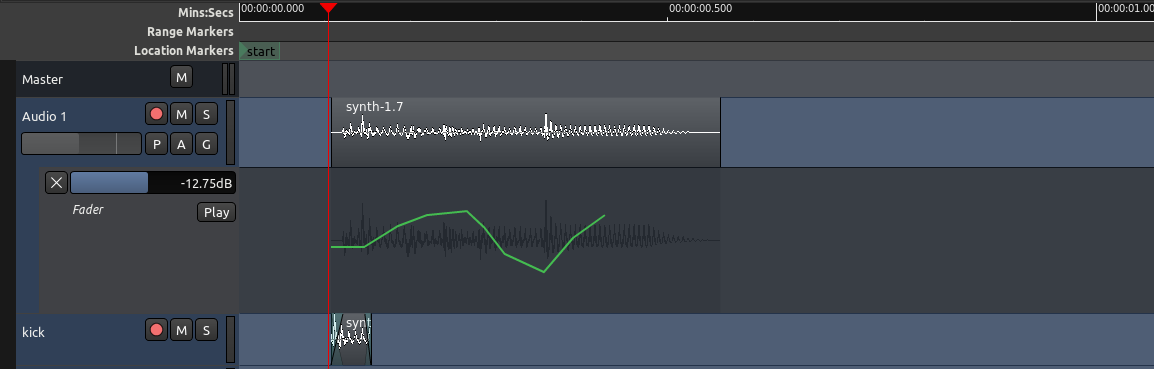
Moving a Region to a new location will automatically move the Automation data that might be aligned with it, as we can see in the following screen shots.
Before moving:
After moving:
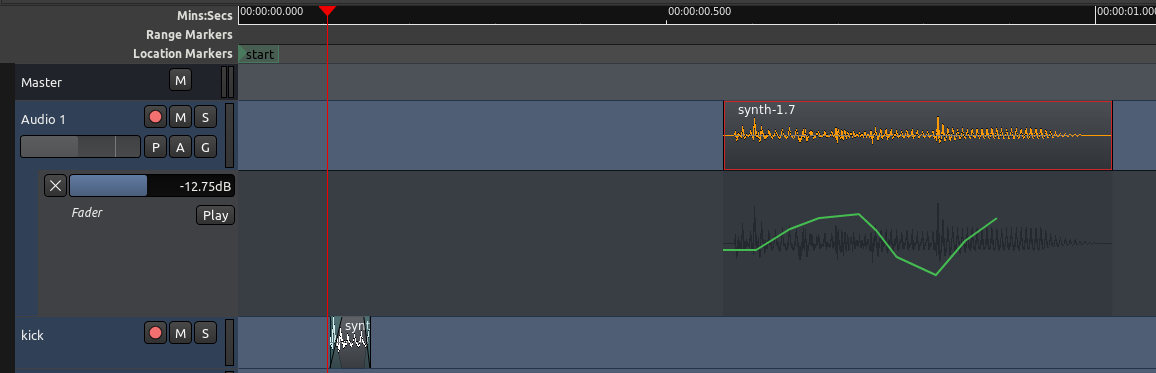
You can change this behaviour if you like. In other words, if you want automation curves to stay where they are even when you move Regions around, go to Edit > Preferences > Editor and uncheck “Move relevant automation when audio regions are moved.”
Region-specific Gain Automation
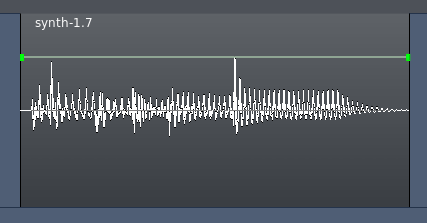
There is a way to create a gain automation directly bound to a Region. When you select Draw Mode, you should see a flat line on the top half of each Region rectangle:
Click directly on that line to create Automation points. These will be drawn directly on the Region itself, unlike Fader Automation which is drawn or recorded in the Automation track. Region Gain Automation is separate from, and in addition to, Fader Automation.
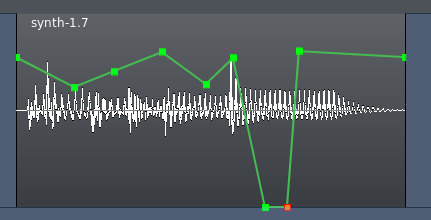
As with the Automation Tracks, a Gain Automation Point can be dragged in any direction with the mouse. To remove a Gain Automation Point, hold down the “Shift” key while Right-Clicking on it.
Deactivating and Removing Gain Automation
Gain Automation can be reset or deactivated from the Region context menu, which is reached by Right-Clicking on the Region.
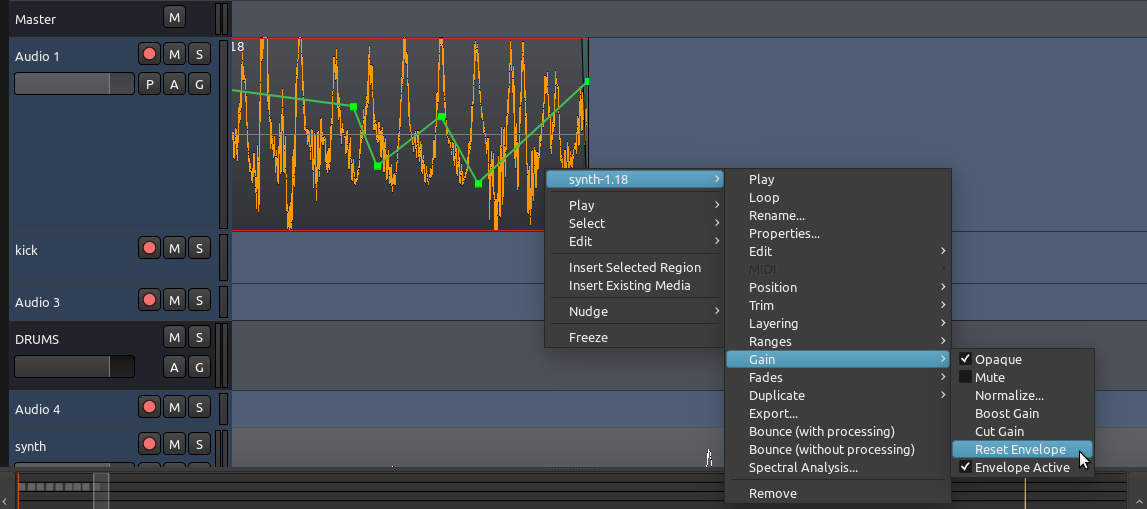
Here, the Gain Automation is referred to as the Envelope.
“Reset Envelope” removes the Gain Automation Points you have drawn in the Region.
“Envelope Active” toggles the Gain Automation Envelope on and off.
When should I use Region Gain Automation or Track Fader Automation?
As seen above, both are very similar. With practice you will notice situations in which one is more convenient than the other. Here are two examples:
- If all you need to do is a little touch up (cut or boost gain) in a specific portion of a Region, and you are otherwise happy with the level for the Rest of the passage or entire track, use the Region-specific Automation.
- If you have a more complex Track with crossfades over Regions, and/or need to shape a longer dynamic curve across several Regions on the same Track, use Fader Automation.
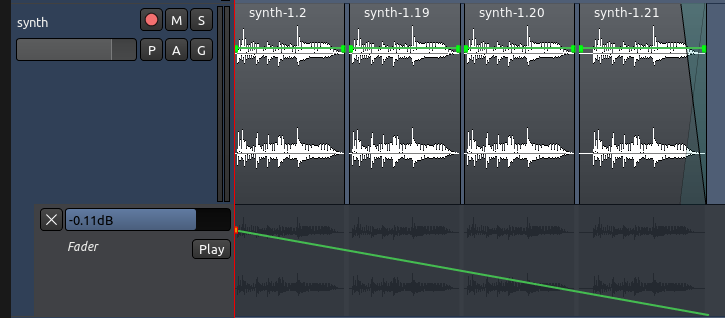
The screenshot above shows a simple gradual fade starting from the first Region in the track, and ending at the last Region. It’s very straightforward to do this with Fader Automation, but but it would be much harder to do it using region-specific automation.
Continuing
Once you have your Automation in place, you are just about ready to Export your Stereo Mix to an audio file which you can listen to, burn as a CDR or convert to an MP3/OGG to share on a website. Please continue on to the next section, Exporting Sessions, to learn the different ways of doing this.
Next: EXPORTING A SESSION