Ardour is a professional, full-featured hard disk recorder and Digital Audio Workstation (DAW). Ardour is Free/Libre Open Source Software (FLOSS).

It features unlimited audio tracks and buses, non-destructive, non-linear editing with unlimited undo, and anything-to-anywhere signal routing. It supports standard file formats, such as BWF, WAV, WAV64, AIFF and CAF, and it can use LADSPA, LV2, VST and AudioUnit plugin formats.

Ardour runs on Linux and Mac OS X (for Windows, read this), and optionally uses the Jack Audio Connection Kit (JACK) to interface with the computer’s sound card, as well as with other audio applications running on the same system.

More information on Ardour can be found at http://ardour.org/.

Click here to go straight to the Table of Contents

This tutorial provides a beginner’s introduction to using Ardour for basic sound recording and editing tasks. It assumes you already have Ardour up and running on your computer. Please note that this tutorial does not (yet) cover any MIDI functionality.

For information on how to install Ardour on Linux and Mac OS X, please visit https://ardour.org/requirements.html. If using Linux, distributions such as KXStudio and UbuntuStudio offer a wide selection of useful music software, including Ardour.

The remainder of this page includes Credits and Conventions Used in This Text.

Credits

The main body of the manual was written during a Book Sprint led by Derek Holzer in the moddr_lab (http://moddr.net) at WORM in Rotterdam, the Netherlands, between 23 and 27 November 2009, with input and support from the international community of Ardour users and developers. The tutorial was originally written for Ardour 2.X versions. The original FLOSS manual can be found at http://en.flossmanuals.net/ardour/.

In December 2014, the tutorial was updated for Ardour 3.5 and moved to GitHub. The text was completely revised, and screenshots were replaced with newer ones. In August 2015, a similar revision was made to update all screenshots and text to Ardour 4.2. The 2014 and 2015 revisions were made by Bruno Ruviaro.

The Ardour community is invited to contribute content to this tutorial. All text and image files live in https://github.com/brunoruviaro/ardour4-tutorial, which makes it easy for anyone to fork, revise, and remix this text. More info here: http://brunoruviaro.github.io/ardour4-tutorial/how-to-contribute-0/.

This FLOSS manual complements the Ardour reference manual currently under development by the Ardour community, which aims to provide an encyclopedic listing of Ardour’s features. That reference manual can be found at http://manual.ardour.org/.

For a full list of Credits and the License, click HERE.

Conventions Used in This Text

Below are some basic conventions we have adopted in this manual.

Mouse Clicks

Ardour requires a two-button mouse to run (or the emulation of that on your system in some other way). A Click is assumed to be a left button mouse click. A Right Click refers to the right-hand button on the mouse. A “Control”, “Cmd” or “Apple” key pressed with a mouse Click is not the same, and may in fact give a different result.

Key Names & Combinations

The names of keys to be pressed are written in quotation marks and italicised, like this:

“Control”, “Return”, “Backspace”, “R”

Key combinations are written like this:

“Control” + “X”

or

“Apple” + “X”

Many functions are accessible in Ardour by clicking on the various menu items. Additionally you may need to access functions through the menus of OS X, Ubuntu, or other Linux distributions. To illustrate this we use two conventions: the first is illustration via screenshots (images), and the second is through a Syntax like this :

View > Zoom > Zoom to Session

The above example is shorthand for “first click on the View menu, then choose the Zoom item of the list, and then click on Zoom to Session”.

Glossary Words

This tutorial does not assume any previous knowledge of computers or audio editing, so terms which might be unfamiliar to the general reader are capitalized throughout this manual, and are listed in Boldface the first time they are used in a chapter. Glossary words are also defined in-line the first time they occur in the manual, and are included in the Glossary at the end of this manual.

Next: Jump to TABLE OF CONTENTS or WHAT IS DIGITAL AUDIO?

Ardour is a Digital Audio Workstation (DAW). Beforing using it to record and edit sound, it might be useful to review how digital audio works.

analogue-digital

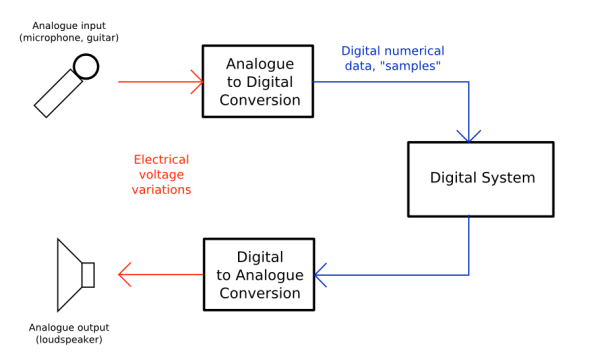
The diagram above shows how sound travels to and from your computer. The “Analogue to Digital Conversion” (ADC) and the “Digital to Analogue Conversion” (DAC) are done by the sound card or audio interface. The “Digital System” in this case is your computer running Ardour.

Frequency and Gain

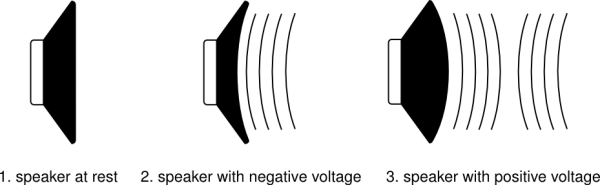
Imagine a loudspeaker. To move the air in front of it and make sound, the membrane of the speaker must vibrate from its center position (at rest) backwards and forwards. The number of times the membrane vibrates each second determines the Frequency (the note, or pitch) of the sound you hear. The distance the membrane travels from its resting point determines the Amplitude (the volume, or loudness) of the sound. Normally, we measure Frequency in Hertz (Hz) and Amplitude in Decibels (dB).

speaker

Check out the great animation on this page illustrating this process: http://animagraffs.com/loudspeaker/

A microphone works like a loudspeaker in reverse: vibrations in the air cause its membrane to vibrate. The microphone turns these acoustic vibrations into an electrical current. If you plug this microphone into a computer’s sound card and start recording, the sound card makes thousands of measurements of this electric current per second and records them as numbers. The number of Samples (i.e. measurements) made per second is called the Sample Rate, and the number of possible values each Sample can have is called the Bit Depth. The combination of Sample Rate and Bit Depth indicates how closely the digital signal can reproduce the sound it has recorded.

Peaks and Clipping

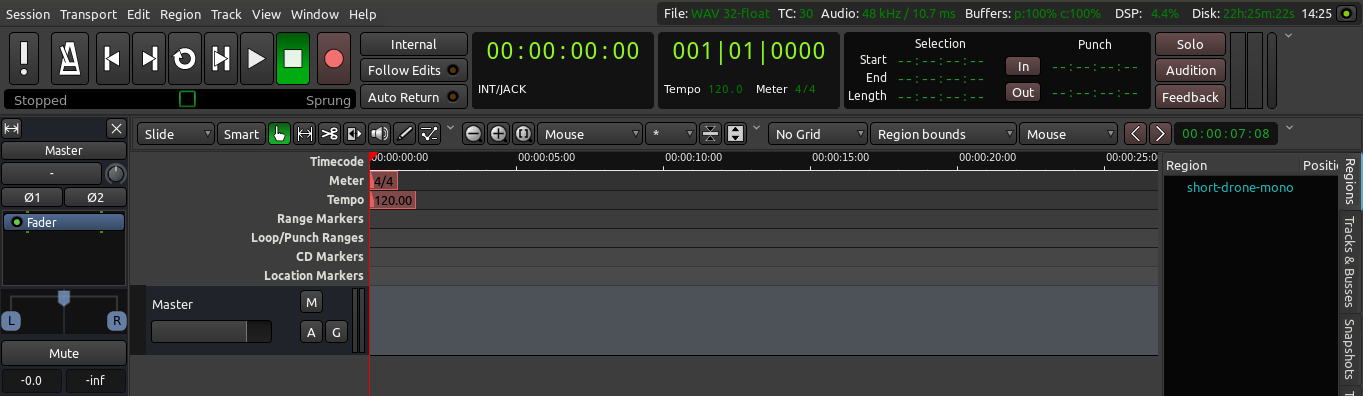
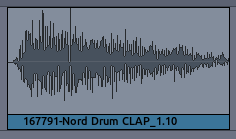
When Ardour displays the Samples which have been recorded, they appear as the Waveform we see below. The center horizontal line indicates the membrane of the speaker at rest, and the Peaks of the Waveform indicate the maximum Amplitude.

waveform

If we take a Waveform and increase its the Amplitude a lot, some of the Peaks may now fall outside the range that the computer can represent digitally. The computer’s inability to represent Peaks outside the range of Amplitude is called Clipping, which results in a permanent loss of digital information, as well as a change in the sound quality which is recognizable as Distortion. Ardour marks clipped Peaks with the color red, as can be seen in the image below.

clipping

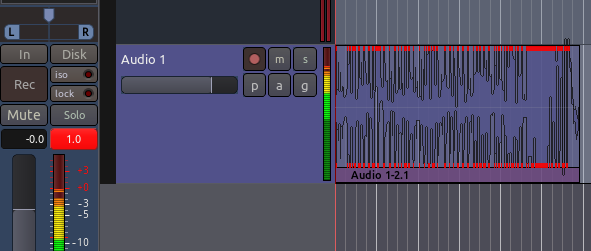
In the image above, one can also see the Mixer Strip on the far left, which gives a running measurement of the Peaks, as well as an indication at the top of the Peak Meters showing the maximum Peak so far. The red number indicates Clipping has occurred.

TIP: Clipping often can happen at the time of recording if you set your microphone levels too high.

The range of decibels between the region’s maximum peak and the clipping point is commonly referred to as Headroom, and common recording practice is to keep approximately three to six Decibels of Headroom between the maximum of your signal and the clipping point, with the clipping point itself being represented as 0 dB (zero Decibels). In other words, an audio region with a comfortable amount of Headroom would have its maximum peaks between −6 dB and −3 dB.

Also, because the Peaks of audio signals add together, care must be taken when Mixing several sources together to keep the combined signals from Clipping.

Sample Rate and Bit Depth

To make audio playable on a compact disc, for example, the computer must generate 44,100 Samples per second. The Sample Rate determines the highest frequency which can be recorded or played back by the computer. A sampling rate of 44.1 kHz means that the highest frequency which can be represented is just under 22.05 kHz. Since normal human hearing lies within the range of approximately 20 Hz to 20 kHz, this is commonly accepted as a reasonable Sample Rate. Other commonly used Sample Rates include 48 kHz (DAT recorders) or 96 kHz (DVD audio).

Each Sample is recorded as a 16-bit number. One Bit is a piece of information which is either 0 or 1. If there are 16 bits together to make one sample, then there are 2^16 (65,536) possible values for each sample.

Thus, we can say that CD-quality audio has a Sample Rate of 44.1 kHz and a Bit Depth of 16 bits. Professional music recordings are usually mixed using 24 bits to preserve the highest amount of detail before being mixed down to 16 bits for CD. Older computer games have a distinctively rough sound, using only 8 bits. By increasing the Sample Rate, we are able to record higher sonic frequencies, and by increasing the Bit Depth, we are able to use a greater Dynamic Range (the difference between the quietest and the loudest sounds possible to record and play).

Click here for a great video tutorial explaining sampling rate and bit depth in a lot more detail.

Next: CHAPTER INDEX

Ardour 4.X no longer requires that you have JACK (the JACK Audio Connection Kit) installed on your system. But you may want to have JACK available so that Ardour can share audio and MIDI with other Linux audio applications. If you are wondering just what on earth JACK is then take a look here: http://ardour.org/jack.

If you do not plan to use JACK with Ardour, you may skip this section. Otherwise, read on.

In a nutshell, JACK is an audio system which manages connections between Ardour and the soundcard of your computer, and between Ardour and other JACK-enabled audio programs on your computer. Ardour used to require JACK in order to run, but since version 4.0 this is optional.

More info on JACK: http://jackaudio.org/ and http://jackosx.com/.

On Ubuntu, you may use either Qjackctl or Cadence to start and stop JACK and control its settings. If you have a properly configured KXStudio installation, JACK may be already running in the background. If not, you may have to manually start it.

On a Mac, you will need to use JackPilot. This page may be of help: http://en.flossmanuals.net/ardour/ch005_installing-jackosx/ (Warning: details on that page may be outdated. Eventually we hope to include an updated page like that in this tutorial).

Using Cadence (Linux)

Launch Cadence. If JACK is already running, you will see a window like this:

cadence

More info on Cadence: http://kxstudio.sourceforge.net/Documentation:Manual:cadence_introduction

Using Qjackctl (Linux)

If using Qjackctl instead, this is how it should look like:

qjackctl

If not yet running, use the “Setup” button to configure JACK, and hit “Start” to start JACK.

Using JackPilot (OS X)

Please check this page: http://en.flossmanuals.net/ardour/ch013_starting-jackosx/ (Warning: this page may be outdated. It’s provided here just as a starting point. Eventually we hope to include an updated version of it in this tutorial).

JACK Settings

More info on Jack configuration: http://kxstudio.sourceforge.net/Documentation:Manual:jack_configuration (explanation shown using Cadence, but same basic information applies to Setup window in Qjackctl).

Continuing

Next: STARTING ARDOUR

Once you have started Ardour, the Session Setup window shows up.

New Session

You can click on New Session to create a brand new session, or you can open an existing session using the Other Sessions options. For now let’s create a fresh session, so click on New Session. The window should now look like the screenshot below.

Name your new project and click Open .

New Session

TIP: Avoid using any characters other than letters and numbers when naming your session. Avoid white spaces, accented letters, !@#$%*()+, periods, commas, etc. Use dashes or underscores if you like. For example, instead of “My Great Session!”, prefer “My_Great_Session”, or “MyGreatSession”, or “my-great-session”. Instead of “Açaí”, write “Acai” (without accented letters), etc. Once you have created your Ardour session, do not manually rename any folders or files that belong to the Session.

Continuing

Next: An Overview of the Interface