This section will give you an overview of the basic interface of Ardour.

We will take a look at the Editor Window and the Mixer Window. Later chapters will give more detailed information on each feature listed here.

The Editor Window

When you create a new session, Ardour opens an empty new window called the Editor Window. The Editor Window is the most important window in Ardour, as this is how you will control the program as well as see and edit the audio you have recorded or imported.
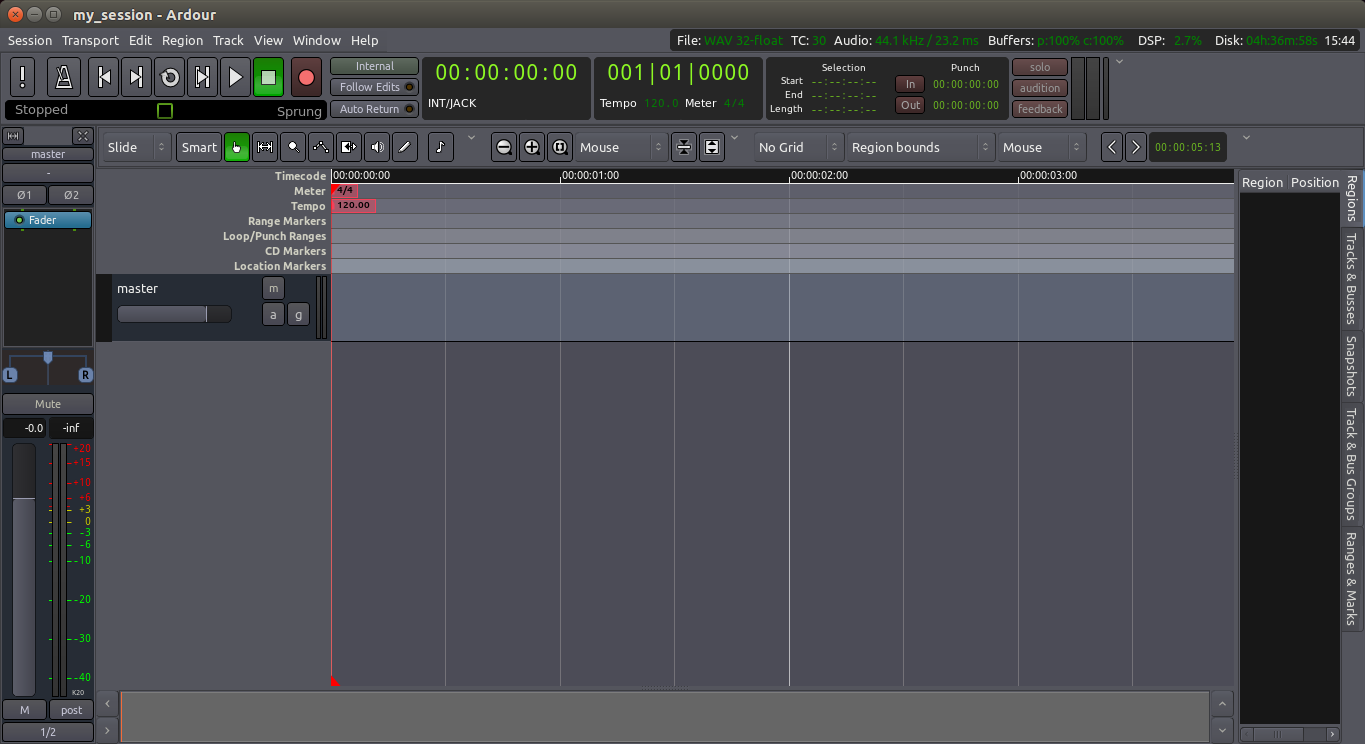
Empty Session

At the top of the Editor Window are several main areas: the Transport Menu, the Clocks, the Edit Modes/Cursor Modes menu, the Snap Mode menu and the Auxiliary Controls. Below that area is the Main Canvas, which contains the Tracks and Busses used in the Session. The Mixer Strips for the Tracks appear on the left, and a set of tabs allowing for an overview of the Regions, Tracks/Busses, Snapshots, Edit Groups and Chunks appear on the right. The very bottom of the window is the Summary view, which is a miniature timeline view allowing for quick navigation through the session.

We will introduce these controls briefly here and cover them more extensively in dedicated chapters later on.

Transport Menu

Transport Menu

The Transport Menu controls include the following buttons:

  • MIDI Panic
  • Enable/Disable audio click (metronome)
  • Rewind
  • Fast forward
  • Loop playback
  • Play range/selection
  • Play from playhead
  • Stop
  • Record-enable 
  • Jog/shuttle controls

Clocks

Clocks  

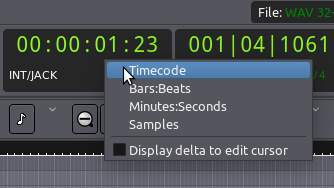
The main Clocks are located next to the transport controls. Clocks in Ardour can display time in 4 different formats: Time Code, Bars:Beats, Minutes:Seconds, and Samples. Right-click on the clock to select a format. You can also turn the clock off. The reason for having two transport clocks is that it allows you to see the playhead position in two different time units without having to change any settings.

Please see the Setting Up the Timeline chapter for more details on the Clocks.

Edit Modes and Cursor Modes

Edit Modes

The Edit Modes and Cursor Modes controls define the behavior of the main canvas and the different functions the cursor can have. There are three Edit Modes in the drop-down menu: Slide Edit, Splice Edit, and Lock Edit. To the right of the Smart button are the Cursor Modes:

  • Select/Move Object (shortcut “O”)
  • Select/Move Range (shortcut “R”)
  • Select Zoom Range (shortcut “Z”)
  • Draw Region Gain (shortcut “G”)
  • Stretch/Shrink Regions (shortcut “T”)
  • Listen to Specific Regions
  • Draw/Edit MIDI notes (shortcut “D”)
  • Note Level Editing (shortcut “E”)

The first six modes are discussed in the Working With Regions chapter. This tutorial does not discuss any of the MIDI functionality of Ardour, so the the last two modes will not be covered.

The Smart Mode button to the left of the mouse mode buttons modifies Object mode. When enabled, the mouse behaves as if it is in “Range Tool” mode in the upper half of a region, and in “Object Tool” mode in the lower half.

Snap Options

Snap

The Snap Options menu controls the Grid, Grid Points and Edit Point. Please see the chapters on Setting Up the Meter, Using Ranges and Working With Regions for more details.

Zoom Options

Zoom Options

In between Cursor Modes and Snap Options are the Zoom Options. Here you can define the behavior of zooming operations. You have standard Zoom In and Zoom Out buttons, plus a third called Zoom to Session (useful for having a quick overview of your entire session: it zooms it to fit the available space on the screen).

TIP: use the shortcuts + (the plus sign on your main keyboard) for Zoom In, and - (the dash key on your main keyboard) for Zoom Out.

The drop-down menu controls the Zoom Focus. It defines the focus point of zooming operations. Try zooming in and out with + and - with a different Zoom Focus each time. For example, choosing Playhead will cause zoom to behave in relationship to the position of the Playhead. Mouse will take your current mouse position as the reference, and so on.

The last two buttons are a kind of “vertical zoom.” They allow you to expand and shrink all tracks and busses vertically.

Auxiliary Controls

For further information on other buttons and displays on the main interface, please refer to the Ardour Manual at http://manual.ardour.org/

Main Canvas

The main canvas is just below the top rows of controls described above. It basically comprises the Rulers, the space where Tracksand Busses are displayed, horizontal and vertical scroll bars and a Zoom Options section at the bottom. The very bottom of Ardour’s Editor Window also displays useful information, such as sample rate of the session, available recording time, DSP use, and miscellaneous error messages.

Rulers

Right-click on the rulers space and you will see a menu with all the possible rulers at your disposition. You may uncheck rulers that you don’t need in order to save screen space. More information on these operations can be found in the Setting up the Timeline and Setting up the Meter chapters.

Ardour Overview Rulers

Tracks and Busses

Just below the Rulers is where Tracks and Busses are displayed. In the example below, you can see one Bus called “master” and one Track called “My Track”. “My Track” also contains one region, which represents an audio file with a drawing of its waveform. More information on Tracks and Busses can be found in the Creating a Track or Bus chapter.
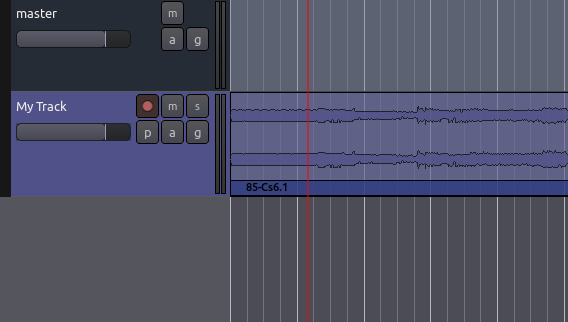
Ardour Track

Editor Mixer

The Editor Mixer is located at the left of the Edit Window. It displays the Mixer Strip of the currently selected Track or Bus. It controls the volume, Plugins and Routing for the Track or Bus to which it corresponds. You can toggle to view or hide the Editor Mixer by clicking on the menu View > Show Editor Mixer (shortcut “Shift” + “E”). This Mixer is covered in the Using the Mixer Strip chapter.

Editor Mixer

Regions, Tracks/Busses, Snapshots, Groups, Ranges, Marks

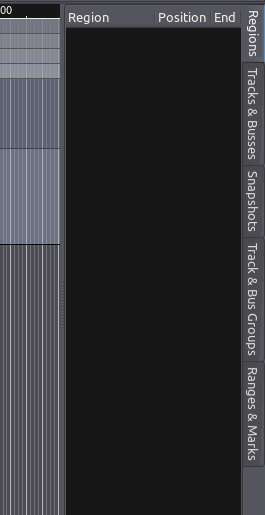
The space on the right of Ardour’s Editor Window can have 5 different functions, depending on which tab is currently selected: Regions, Tracks/Busses, Snapshots, Track & Bus Groups, and Ranges and Marks. Regions is the tab selected by default. This part of the Editor Window is commonly referred to as Regions List. Regions represent audio files stored on the hard drive which can be dragged from the Regions List directly onto a track in the main canvas. More information on Regions can be found in the Working With Regions chapter. The Tracks tab is covered in the Arranging Tracks chapter, and Snapshots are discussed in the Saving Snapshots chapter.
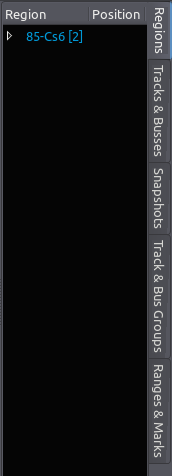
Region List

Mixer Window Controls

The second window, the Mixer Window, can be viewed by going to the main menu and clicking Window > Show Mixer.
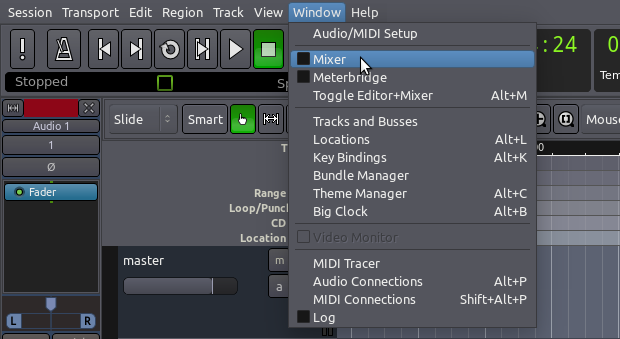
Mixer Window

The main function of the Mixer Window is to display all the Mixer Strips for the various Tracks side by side for easy reference. This window is mainly used during the Mixing process, and it also provides access Plugins and other Routing features. See the chapters on Understanding Routing, Mixing and Using Plugins for details.
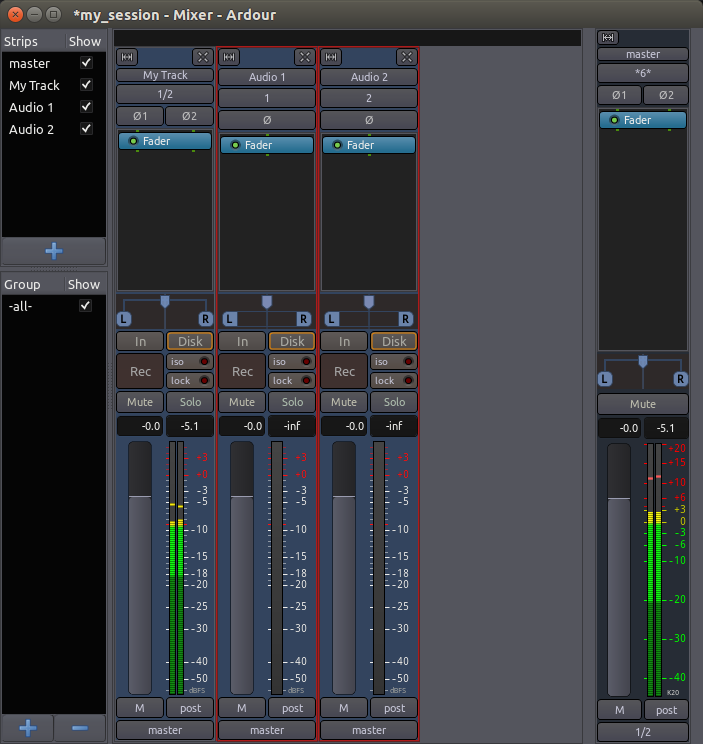
Mixer Window

This window also contains a listing of the available Mixer Strips in the upper left hand corner. The check boxes in this area can be used to view and hide the Mixer Strips of the different Tracks. Finally, there is an area for managing Groups.

Switching Between Windows

You can use the key combination “Alt” + “M” (“Option”+ “M” on a Mac) in order to toggle which window is on top: Editor or Mixer.

Detaching and Reattaching Menus

Most of the major menus in the Editor Window can be detached from the Editor Window by clicking the white, downwards pointing arrow on the far right-hand side of that menu.

Zoom Options

The detached menu will become a separate window on your screen, which can be reattached to the Editor Window by clicking the white, upwards-pointing arrow which now appears on the far right-hand side.

Continuing

The next chapter will explain how to start a fresh new project.

Next: STARTING A SESSION

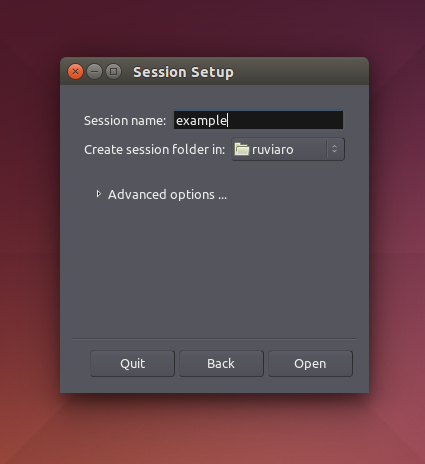
Ardour groups your work in Sessions. A Session is a group of Tracks which eventually may be mixed down into a single Mono, Stereo or multi-channel sound file. Sessions are essentially projects; all your data is saved in a single Session folder.

When you start Ardour, you are asked if you want to start a new Session or open an existing one. When creating a new Session you must choose a name for it.

TIP: Avoid using any characters other than letters and numbers when naming your session. Avoid white spaces, accented letters, !@#$%*()+, periods, commas, etc. Use dashes or underscores if you like. For example, instead of “My Great Session!”, prefer “My_Great_Session”, or “MyGreatSession”, or “my-great-session”. Instead of “Açaí”, write “Acai” (without accented letters), etc. Once you have created your Ardour session, do not manually rename any folders or files that belong to the Session.

You also need to tell Ardour where you would like the Session folder to be stored.

When you are ready, click ‘Open’. Ardour will create the new Session and then open it.

New Session

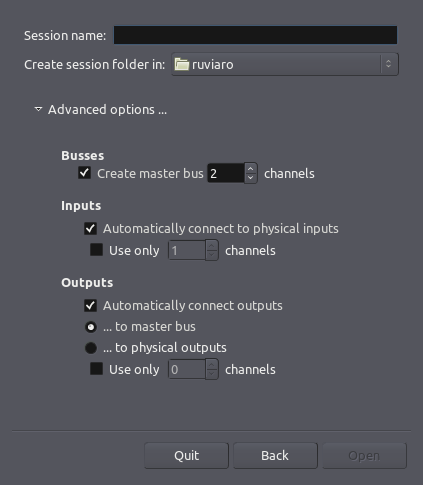
Advanced Options

If you click the small triangle to access the Advanced Options, you will have finer control over the following options:

  • Whether or not to create a Master Bus (i.e. the final audio output of the session), and how many channels it will have.
  • Whether or not to automatically connect inputs from the computer’s audio interface (the sound card) to Tracks in the session, and how many channels to use.
  • Whether or not to automatically connect outputs to either Master Bus or outputs of the audio interface, and how many channels to use.

New Session Set-Up

Note you cannot directly choose the Sample Rate (the number of audio samples recorded in one second) of the new Session. This will be the Sample Rate at which JACK is currently running. Ardour only allows you to open a Session created at the current JACK Sample Rate. For example, a Session created when JACK was running at 96 kHz will not open if JACK is currently running at 48 kHz.

To create an Ardour session after Ardour has already started, select Session > New in the menu.

TIP:

Continuing

Once you’ve started a Session, you will most likely want to learn about setting up the timeline to match the kind of musical meter or other timeframe which you will use. Please continue to the next chapter.

Next: SETTING UP THE TIMELINE

Because different users will want to use Ardour for different tasks, the way time is measured in the application can be changed.

Users creating audio plays, documentaries, reportages or soundscapes may wish to use Minutes and Seconds, for example, while those recording bands or producing electronic music will most likely use Bars and Beats. Video producers will find a frames-per-second Timecode handy, while those wishing for extreme precision may even want to use Samples. All of these can be viewed in Ardour and used as a means to organize your regions and edits.

Primary and Secondary Clocks

There are two clocks near the top of the Editor Window which can display the time in a number of formats: Timecode, Bars:Beats, Minutes:Seconds and Samples. Right-click to change the format of each of the two clocks.

Clock Units

These are called the transport clocks. The left one is the primary transport clock and the right one is the secondary transport clock. The advantage of having two transport clocks is that you see the playhead position in two different time units without having to change any settings.

To the right of these two clocks you also see a set of 5 clocks that show the current selection range and punch ranges. Please refer to the Ardour Manual for detailed information on clock displays.

Snap Modes

The Snap Mode menus are found just below the Clocks to the right. They control the amount Quantization of the time grid, i.e., the amount of “snap” an audio Region has to the type of grid you have chosen.

Snap

When No Grid is selected, Regions may be moved freely around within the Tracks. When Grid is selected, Regions will “snap” to the nearest Grid Point. When Magnetic is selected, Regions can be moved freely but will “snap” to a Grid Point when they are moved very close to one.

The middle Units menu is used to select what the Grid Points will be, such as Beats, Bars, Marks, Minutes, Seconds, various aspects of the SMPTE Timecode, or the edges of Regions. 

Timeline

The Timeline is located below the Snap Mode menus, just above the Main Canvas. By Right-Clicking on it, you can set the check boxes to display the different types of time information.

Timeline

Minutes/Seconds

To view Minutes and Seconds on the Timeline, right-click the Timeline and select Minutes:Seconds. You will be able to set the Grid to either Seconds or Minutes.

Bars/Beats

To view Bars and Beats on the Timeline, right-click the Timeline and select Beats/Bars. You will be able to set the Grid to either Bars, Beats or a convenient multiple of beats, such as 3, 4, 8, 16 or 32.

It is possible to set a Meter and Tempo for the entire Ardour session, as well as to change them at different points in the same session. For more information on this, please see the Setting Up the Meter chapter.

Timecode

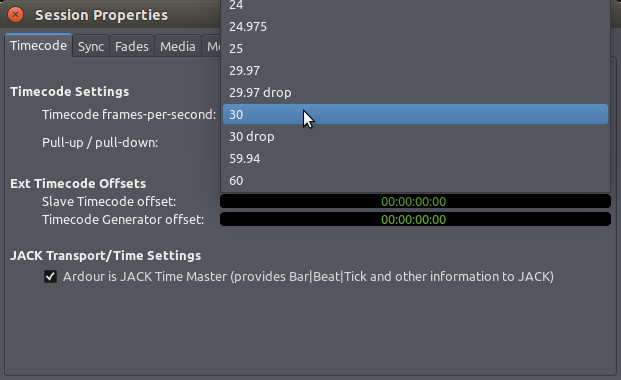
To work with SMPTE video Timecode, first you need to set the Timecode fps (Frames per Second). This can be found in the Timecode tab of the Session Properties window (menu Session > Properties or shortcut “Alt” + “O”).

Timecode

Once you have done that, make sure you make the Timecode ruler visible by right-clicking in the Timeline and checking the Timecode box. You will be able to set the Grid to SMPTE Frames, SMPTE Seconds and SMPTE Minutes.

Continuing

Now that you’ve set up the Timeline, continue on to the chapter on creating tracks and busses to add one or more Tracks to your Session.

Next: CREATING A TRACK OR BUS

What is an Audio Track?

An Audio Track is a place where you can drag a Region from your Region List and where you can record sounds coming from an outside source.

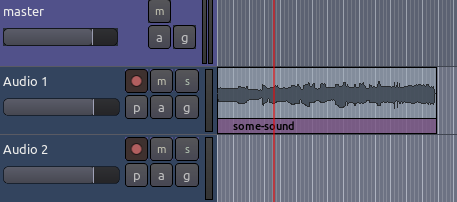
A Region represents an audio clip, i.e., one of your sound files or just a portion of a sound file. In the image below, the horizontal strip areas marked “Audio 1” and “Audio 2” are Tracks. The rectangle containing audio information (named “some-sound”) inside track Audio 1 is called a Region.

Tracks

What is a Bus?

A Bus is similar to a track except that it does not contain its own regions. You cannot record directly into a bus or drag regions into it. In the image above, the area marked “master” is a Bus. Usually every session has a Master Bus. All the audio to be Exported  from your Session will be sent to the Master Bus.

How are Tracks and Busses Used?

Audio-processing Plugins and Automation can be applied to both Tracks and Busses.

Audio tracks can be routed to Busses. In fact, many Tracks can be simultaneously routed to one Bus. Busses are traditionally used as a convenient way to apply any kind of signal processing to many Tracks at once. For instance, you might find it useful to route all Tracks that contain drum sounds to a single Bus that you would call ‘drum bus’. Then, if you decide that all your drum Tracks are too loud, you can quickly adjust the level of the ‘drum bus’ rather than adjusting each separate Track that feeds into it.

Another use of a Bus would be to have a common Reverberation Plugin, so that any audio Track which requires the Reverb effect could be routed to a single Bus.

Adding Tracks and Busses

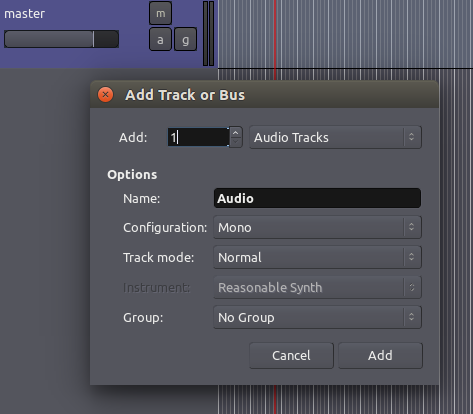
Right-Click in the empty area beneath any existing Tracks and Busses. Alternatively, click on the menu Track > Add Track/Bus (shortcut “Ctrl” + “Shift” + “N”). The following window will appear:

Add Track

Add lets you specify how many Tracks (or Busses) you would to like to create.

Choose Audio Tracks or Busses to specify whether you want to create Tracks or Busses. You can also choose to create a MIDI Track or an Audio+MIDI Track. Ardour offers three track types depending on the type of data they contain, and differentiates between three track modes, depending on their recording behaviour. This tutorial will only cover Audio Tracks and Busses (see the Ardour Manual for details on all track types)

You can optionally give a Name to the Track or Bus being created. The Configuration drop-down menu allows you to specify how many channels of audio you’d like the new Track or Bus to handle. For example, if you will be recording your voice on this track using a single microphone, choose Mono. If you plan to import a clip from an existing song and place it on this Track, choose Stereo. The choice made here will also affect which Plugins you can use on the track (Mono tracks cannot use Stereo Plugins and vice versa).

The menu Track Mode gives you a choice between Normal, Non-Layered, and Tape. Normal Mode creates a new Region for each Recording Take, and is suggested for beginners. For information on the other modes, check the Ardour Manual. Additional information on the Instrument and Group options can be found on this other page of the Manual.

Finally, click the Add button to create the Tracks or Busses you have just configured. You will see them appear as new rows in the Main Canvas.

Continuing

Once you’ve added one or more Tracks, you will want to put some audio material into them to work with. Continue on to the Importing Audio and Recording Audio chapters to learn how to do this.

Next: IMPORTING AUDIO

Sections of audio are known as Regions in Ardour. A Region can be an entire sound file or a portion of it. Here you will learn how to import audio files from the hard drive of your computer so they can be used in your Ardour session.

To import an audio file, first Right-Click on the Region List, located at the far right of the editor window. If you don’t see it, make sure “Show Editor List” is checked under the “View” menu. Once you see the Editor List, please note there are other tabs which change the function of this area. Before you Right-Click, make sure the Regions tab is selected.

Editor List

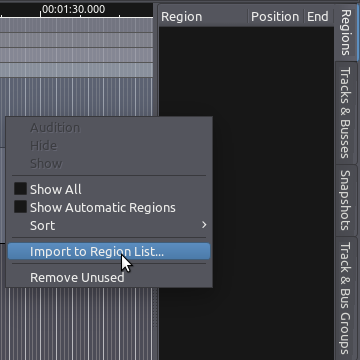
Once you have Right-Clicked, a menu will appear with the option to Import to Region List. Click this option.

Region List

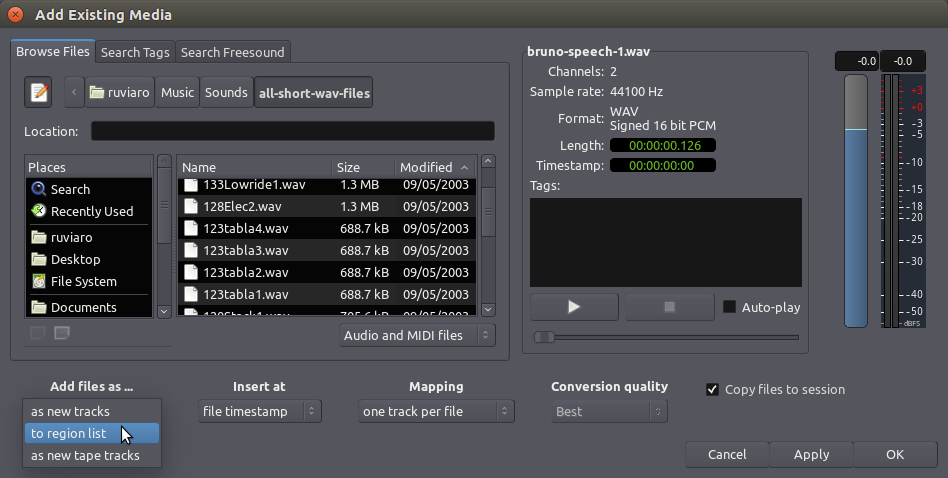
You will now see the Add existing media dialog (note: a shortcut to get to this window is “Ctrl” + “I”). On the left side of this dialog you will see a file browser which allows you to search your hard drive for appropriate sound files to add (preferably, start with a common file format, such as WAV or AIFF). At the lower left corner there is a menu which indicates how these files will be added. “Add files as new tracks” will import audio files and place them on a newly created track. “Add files to region list” will simply import audio files into the Region List, without creating any new tracks. Choose this option now, as we don’t want Ardour to create any tracks at this point.

Add Media

TIP: if you do not have any suitable audio files on your hard drive to follow these steps, click on the “Search Freesound” tab (or visit freesound.org), from where you can find a large collection of Public Domain and Creative Commons–licensed samples in a variety of Sample Rates and Formats.

On the right side of the Add existing media dialog you will see a section allowing you to inspect the properties of the file you selected. Here you will see the name, number of channels, sample rate, format and length of the sound file, along with any tags you have chosen to add to the file.

The Play button allows you to preview the file, using the Audition bus. Finally, this dialog gives you the option of copying the file(s) into the folder of the current session (Copy Files to Session). This is safer, but it uses more disk space. If you leave this option unchecked, Ardour will use the sound file from its current location on the hard drive. In this case, if the file is moved to a new location on the hard drive, you may run into trouble, because Ardour won’t be able to find it the next time you open this session. It is highly recommend that you leave this box checked (“Copy files to session”).

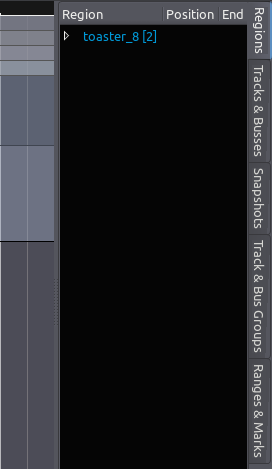
Click OK to proceed. The file(s) you have selected will appear listed in your Region List.

TIP: if the sample rate of the file you have chosen does not match the sample rate of the current session, Ardour colours the mismatched sample rate in red. If you try to import the file, Ardour will also warn you of the mismatched rate and ask you to confirm if you want to embed it anyway. If you do choose to embed the file in question, it will not play back at the sample rate it was recorded with, but rather at the sample rate of the current Ardour session. This will cause the sound to play at the wrong speed and pitch.

Once you have successfully embedded your audio file in the Region List, you will see it on the screen. In the screenshot below, “toaster_8” is the name of the audio file, and the number [2] right after it indicates it is a stereo file.

Toaster

By dragging and dropping the Region onto the Main Canvas, you can insert it in an existing track.

TIP: if you click in the middle of the word when the region name is highlighted in blue, Ardour thinks you are trying to rename the Region (the name will become editable). In order to click and drag a highlighted region from the list, you need to point and click right before or after the name.

Release the mouse-click to complete the drag-and-drop operation. The Region will be inserted at the exact time point where you dropped it.

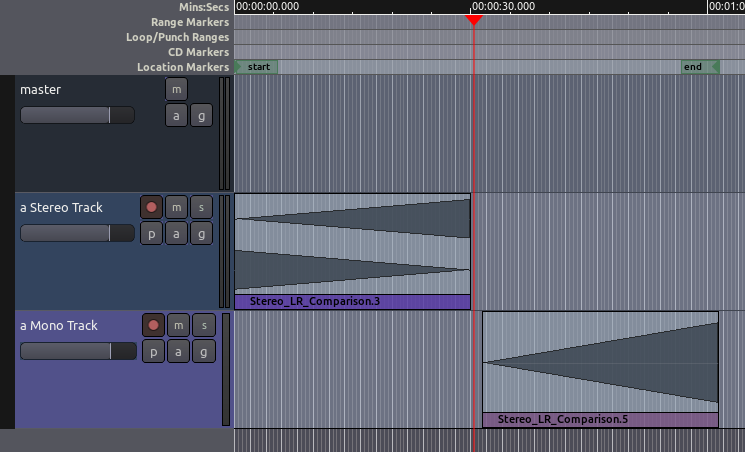
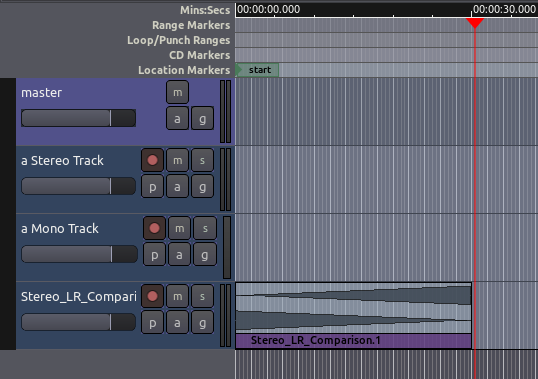
Important: always make sure you are placing Stereo Regions on Stereo Tracks. If you drag a Stereo file onto a Mono Audio Track, only the left channel will used. In the screenshot below, a stereo file with very distinct left and right channels was dragged onto a Stereo Track and a Mono Track. Notice that in the Mono Track only the left channel is displayed (and played back). 

Stereo Mono

Importing Audio Directly to a Track

As mentioned earlier, the Add existing media dialogue also allows you to import audio files directly onto tracks.

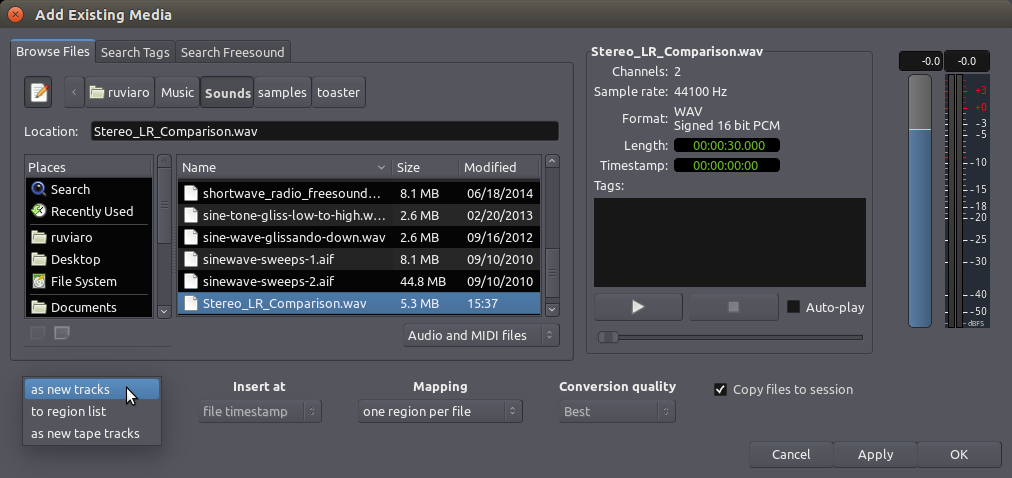
Choose Add files: as new tracks in order to automatically create a new track and add the selected file to it. The track will be named after the sound file name.

Add as New Tracks

If you have previously selected on or more tracks, the menu will display the additional option Add files: to selected tracks in order to add a sound file into the already existing selected track.

Choose Insert Point

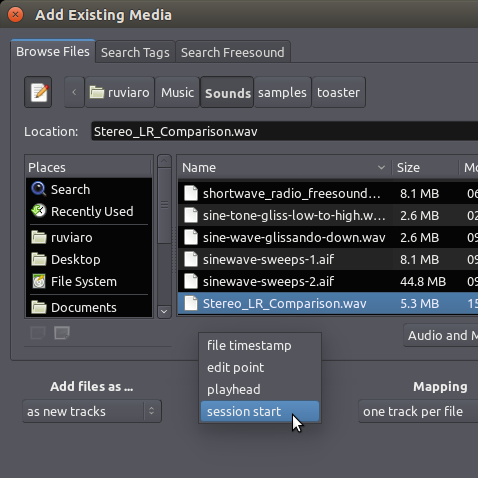
When using either one of the options above (“add as new track” or “add to selected tracks”), you should also specify where in the track you want the new Region to be placed. In the screenshot below, we are choosing “session start”.

Insert At

The Region appears in a new track in the session. The new track automatically receives the name of the imported sound file.

Comparison

The sound file will also appear in the Region List so that it can be inserted into other tracks as well (drag and drop).

Remove Regions from Tracks

To remove a region from a track, one can select it with the mouse and use the Cut function from the menu, the Control (or Apple) key and the X key, the Delete key or the key combination of fn and Backspace (which is used, for example, on a laptop keyboard that does not have a proper Delete key).

TIP: Save your work often! The shortcut “Control” + “S” is your friend. Use it a lot, all the time.

Continuing

At this point, you may wish to add some new material to your Session by Recording Audio in the following chapter, or you may want to skip directly ahead to the Editing Sessions section to learn how to arrange the Regions you have Imported into a composition.

Next: RECORDING AUDIO or ARRANGING TRACKS