You may wish to Export only a Region of your Session, perhaps to use as a sample in another application, or to Edit it in a different editor program. This chapter shows you how.

Exporting a Region

To Export a Region, select it (so it becomes blue), and then right-click into the sub-menu Export, or use the top menu: Region > Export.
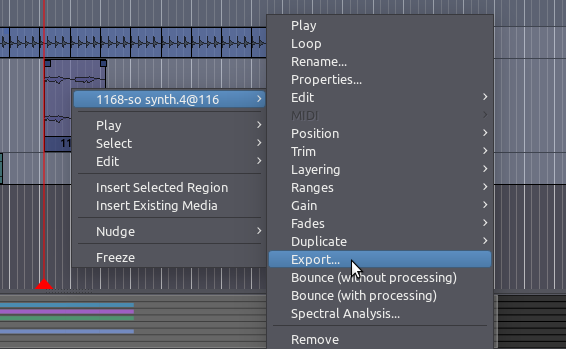
export region

This will open up the same Export dialog box explained in the Exporting a Session chapter. Choose your options, and click “Export”. Only the selected Region will be exported.

Please note that when exporting a Region, not all parameters and edits are exported. Trimmed, split, stretched and reversed regions can be exported, but edits such as and Panning, and Automation are not exported. Also, the volume of the audio Track itself or the Master Bus will not affect the exported file. To export these edits, please see the chapters on Exporting a Range and Exporting a Session.

Exporting Several Regions At Once

If you are building a collection of samples to use later in another software, and your samples are basically trimmed and edited Regions, at the end of the process you will need to export all of them. If the number is large, exporting them manually can be tedious. Here’s one way of exporting several Regions at once.

  • In Object Mode (shortcut “O”), select all the Regions you want to Export. They do not need to be on the same Track.

  • Go to menu Region > Ranges and choose Add Range Marker Per Region.
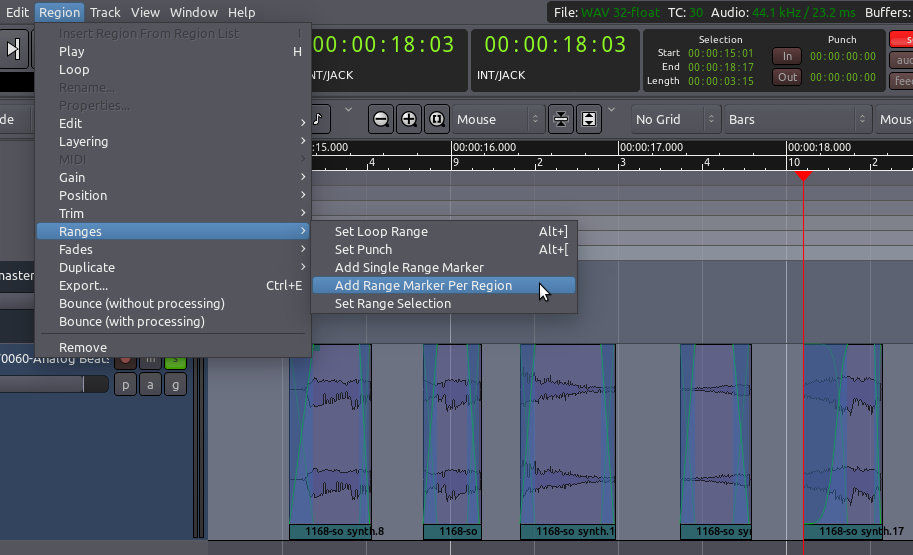
export region

  • Ardour has now just created Range Markers that fit exactly the beginning and ending of your selected Regions (see the green rectangles in the Range Markers timeline):
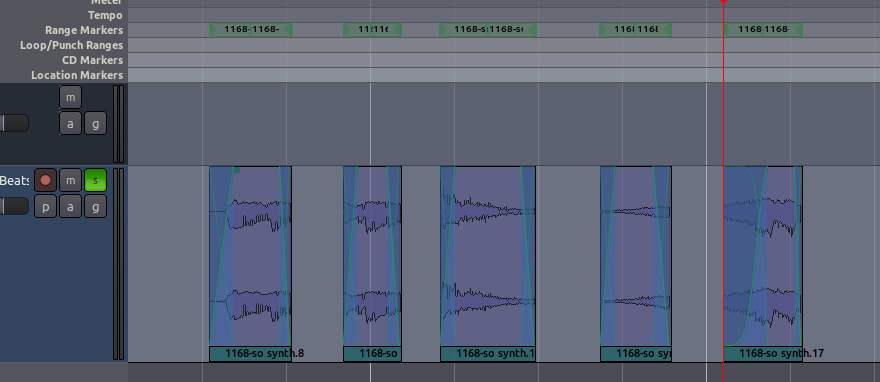
export region

  • Go to menu Session > Export and choose Export to Audio File(s).

  • In the Export dialog box, click on the little triangle next to “Time span and channel options”. You will see all the newly created Ranges listed there. There is also a default Range that stands for the entire Session.
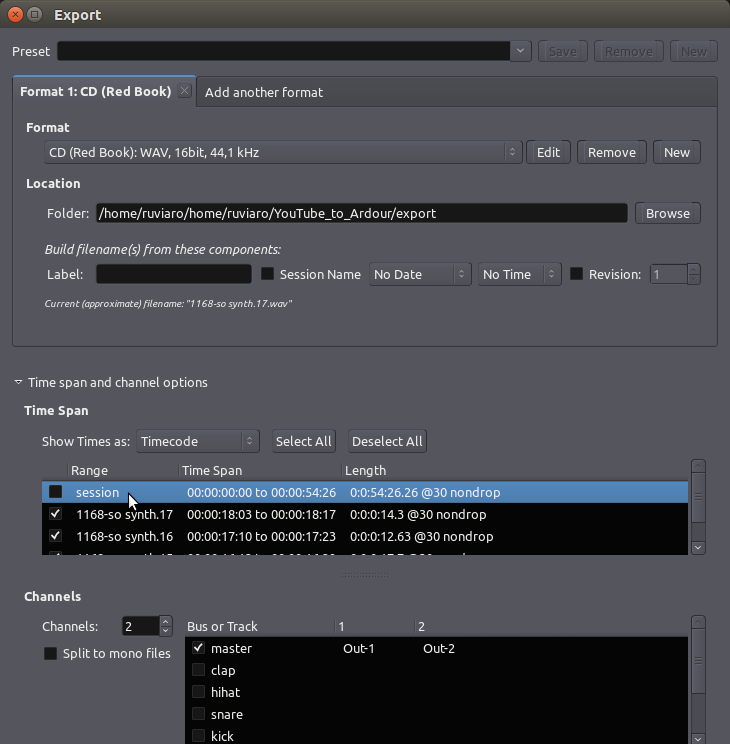
export region

  • Under “Time Span”, click “Select All”, and de-select the very first Range (the “session” Range). The reason is because we want to export the shorter Ranges, not the whole Session.

  • Close the “Time span and channel options” by clicking on the little triangle again.

  • Click “Export”.

You Regions have now been exported to single audio files.

Continuing

Finally, the next chapter will show discuss Exporting Ranges rather than just an individual Region. The last trick (exporting multiple Regions at once) in fact already involved using Ranges, as you may have guessed.

Next: EXPORTING A RANGE
Learn how to export a selected portion (Range) of your Session.

Exporting is the process of saving a Region, Track or Session to a file on your computer. As we learned previously, exporting an isolated Region does not export all of the changes you might have made to that Region. To export edits such as Panning, Fader Automation, and Plugin effects, you must Export either a Range or the entire Session.

Exporting a Range

To export a range, follow these steps:

  • CLick on the Select/Move Ranges tool (shortcut “R”)

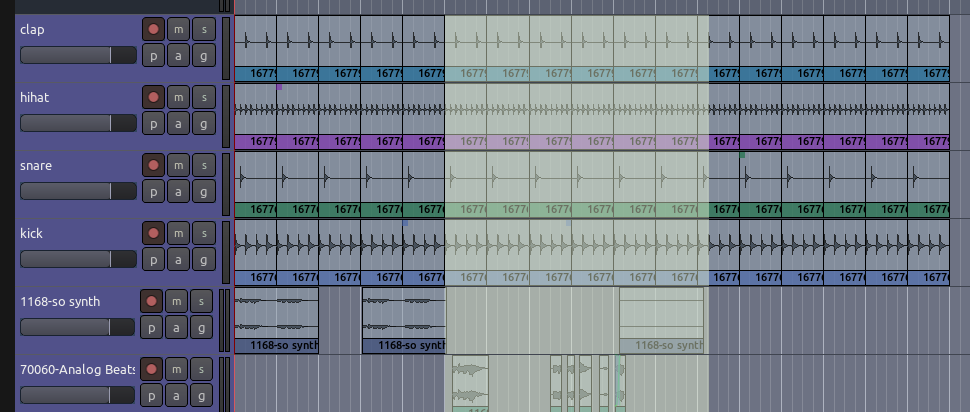
export range 0

  • Make a Range selection:

export range 1

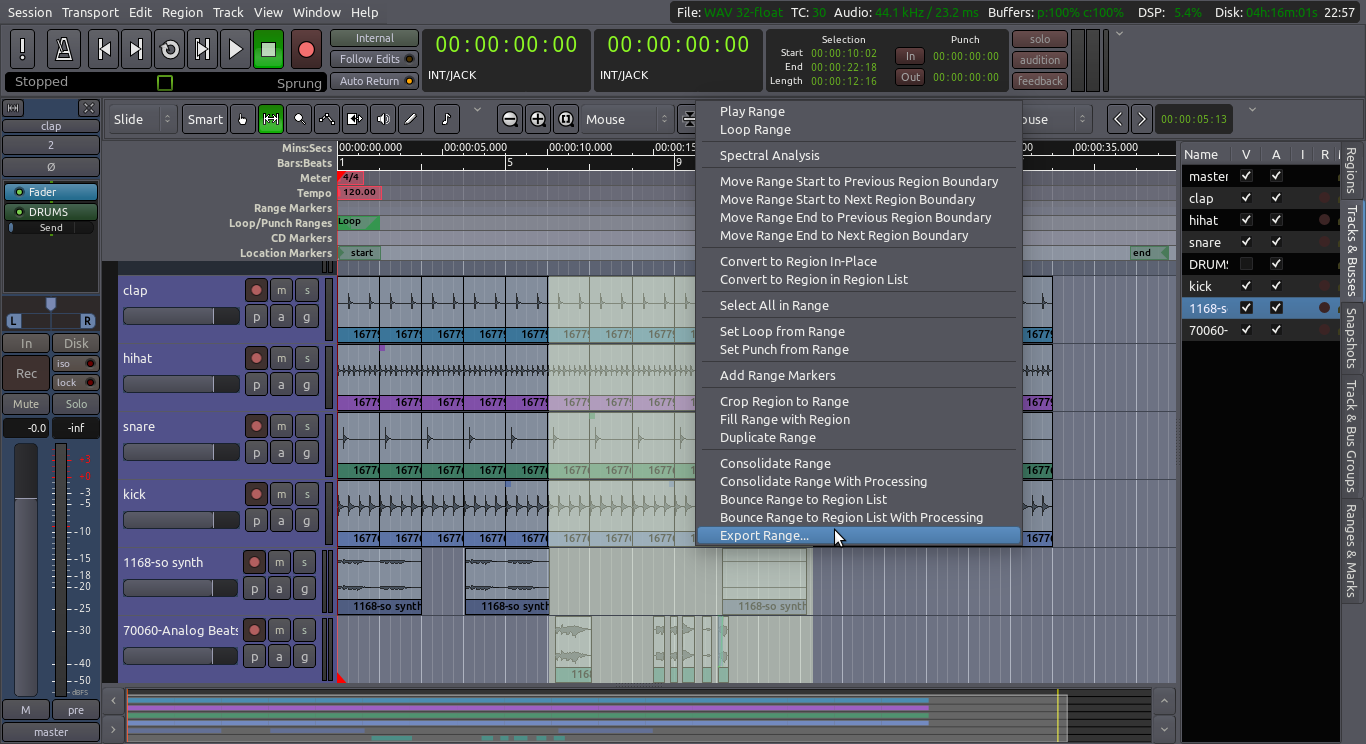
  • Right click on the Range and choose “Export Range” from the menu:

export range 2

This will open the familiar Export dialog explained in the Exporting a Session chapter. Choose your options, if any, and click Export. The Range will be exported and saved as an audio file.

What exactly is a Range?

To define a Range is simply to specify a beginning and ending point in time. The Selection display to the right of the secondary clock shows the start and end times of the selected range, as well as its duration. The Range created through the method above will disappear as soon as you click outside of it.

The Export Range command will export everything that plays through the Master Bus, exactly as it plays back in your Session. If any of the Tracks have the Mute or Solo buttons engaged, this will also affect which Tracks are heard in the Exported file.

What is a Range Marker?

Range Markers are essentially two location markers the are grouped together to mark the beginning and end of a section in the timeline. You can user Range Markers to “bookmark” (so to speak) one or more Ranges that you need to remember or use again later. Range Markers look like this on the timeline:

range markers

There are a few ways to create Range Markers:

  • From a Range selection, right click on it and choose “Add Range Marker”.
  • From the timeline, right click on the “Range Markers” horizontal space and choose “New Range”.
  • From one or more selected Regions, right click on the Region and choose “Add Single Range Marker” (if a single Region is selected), or “Add Range Marker Per Region” (if multiple Regions are selected).

TIP: You can clear all existing Range Markers by right-clicking on the Range Markers area of the timeline and choosing “Clear All Ranges”.

Continuing

You now know how to Export isolated Regions, selected Ranges from your Session, or the entire Session as a Stereo Mix. The last section of this tutorial explains saving sessions, snapshots, and templates.

Next: SAVING A SESSION

There are a number of ways to save Sessions in Ardour, so that each Session can be use later on. The simplest way is to save the entire Session just like you would save other documents: hitting “Control” + “S”.

A new Session is first saved at the moment you create it. While you are working on it, you should save it frequently. Get into the habit of hitting “Control” + “S” (or “Command” + “S” on a Mac) every few minutes.

TIP: Avoid using any characters other than letters and numbers when naming your session. Avoid white spaces, accented letters, !@#$%*()+, periods, commas, etc. Use dashes or underscores if you like. For example, instead of “My Great Session!”, prefer “My_Great_Session”, or “MyGreatSession”, or “my-great-session”. Instead of “Açaí”, write “Acai” (without accented letters), etc. Once you have created your Ardour session, do not manually rename any folders or files that belong to the Session.

Ardour File and Folder Format

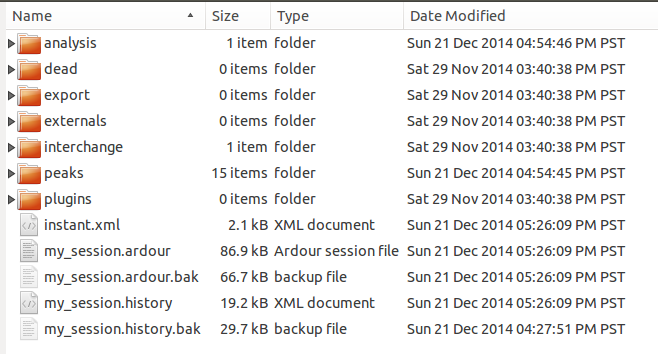
The contents of a typical Session’s folder on your hard drive might look something like this:

Ardour Folder

A bit of information about some of the components inside that folder:

  • The name of this Session is “my_session”.
  • The main session file is called “my_session.ardour”. The Session file is periodically backed up by Ardour with a .bak extension.
  • The .history file keeps a record of changes you have made during your Session, and is also periodically backed up.
  • The interchange folder contains the actual audio data of all the Regions used in your Session.
  • The export folder is where exported files are saved by default.

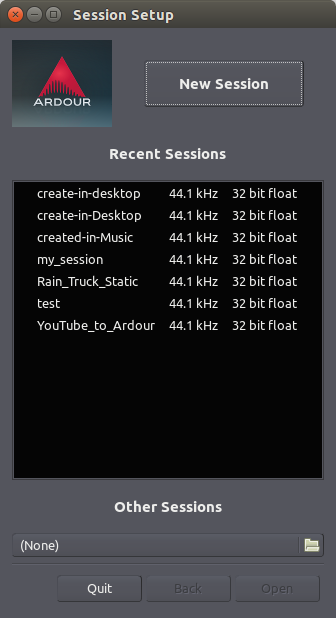
TIP: If double-clicking on the session file does not launch Ardour, use the standard method of first opening the application itself, then choosing a session from the Session Setup dialog.

Ardour Opening

Continuing

Saving an entire Session allows you to open it again at a later time. However, if you would like to preserve a certain state that your Session is in, to be able to return to that state later on after you have made changes, then please continue to the next session called Saving a Snapshot.

Next: SAVING A SNAPSHOT

Saving a Snapshot in Ardour is similar to saving your Session to a new file, however using a Snapshot avoids overwriting the original Session file. A Snapshot contains the current state of your work, while sharing all the audio and data files of the Session.

Saving a Snapshot

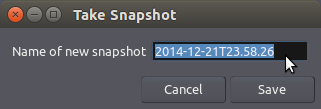
You can save a Snapshot via the menu: Session > Snapshot (shortcut “Control” + “Shift” + “S”).

snapshots

By default the program will name the new Snapshot according to the current date and timestamp of your system. If you wish, you can change the name to one that more meaningfully corresponds to the Session you are working on.

Recalling Snapshots

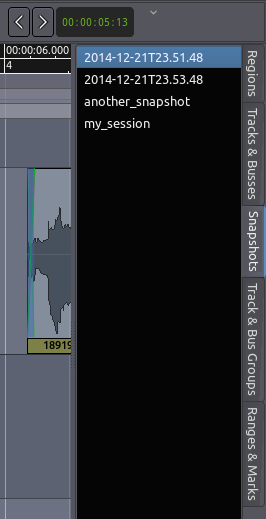
You can recall a saved Snapshot via the ‘Snapshots’ tab in the area on the right:

snapshot2

There you see a few Snapshots that we created, and the ‘my_session’ entry represents the original state of our session.

Double-click on any Snapshot from the list to reload it.

Continuing

Sometimes it is helpful to have a default starting point for new Sessions, for example for a set-up that you use all the time when starting a new project. To learn how to do this, please continue to the next session called Saving a Template.

Next: SAVING A TEMPLATE

If you often go through the motions of setting up the same information in each new Session you create, such as the number of input and output Channels, the number and names of Tracks or Busses, or the Routing, then you may wish to create a Template of that information instead.

With a Template, you can save the state of a currently open Session without all the Region information files. Templates are useful if, for example, you’re doing extensive Routing on Tracks and Buses and want to save the Editor Window’s state for use in other Sessions. An example might be a Template to record Tracks of drums, bass, guitar and vocals, each with their own input on the soundcard, which you might use as a basis for each Session you created in that situation.

Save a Template

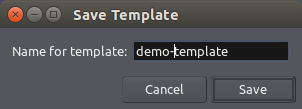
You can save a new Template from the Main Menu: Session > Save Template. You are asked to give the new Template a name:

template1

Load a Template

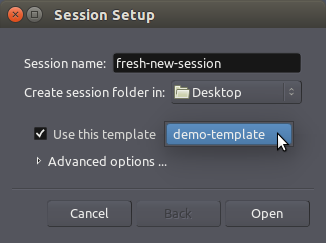
When creating a new Session, you get can now load up a previously saved Template:

template2

In summary: Session Templates are a way to store the setup of a session for future use. They do not store any audio data but can store:

  • The number of tracks and busses, along with their names.
  • The plugins present on each track or bus (if any).
  • All I/O connections.

Conclusion

Congratulations, you have reached the end of this introduction to Ardour! We hope that this tutorial has been useful for you to learn the key functions of Ardour.

In the following section, the Appendices, we have included some extra information we thought would be useful to new users of Ardour, including how to get Further Help, a Glossary of technical terms used in this manual, some Links to further information about Ardour on the Internet and, last but not least, the Credits of those involved in creating this Free/Libre Open Source Software (FLOSS) Manual.

Thanks for reading, and if you have some knowledge about Ardour that is not included here, please feel free to propose changes. Also, this manual itself is fully open source and lives at https://github.com/brunoruviaro/ardour3-floss-tutorial. You can even fork it and create your own customized version of it!

Appendices: FURTHER HELP || GLOSSARY || LINKS || CREDITS