Besides Importing Audio, another way to create Regions in your Ardour session is to record new audio.

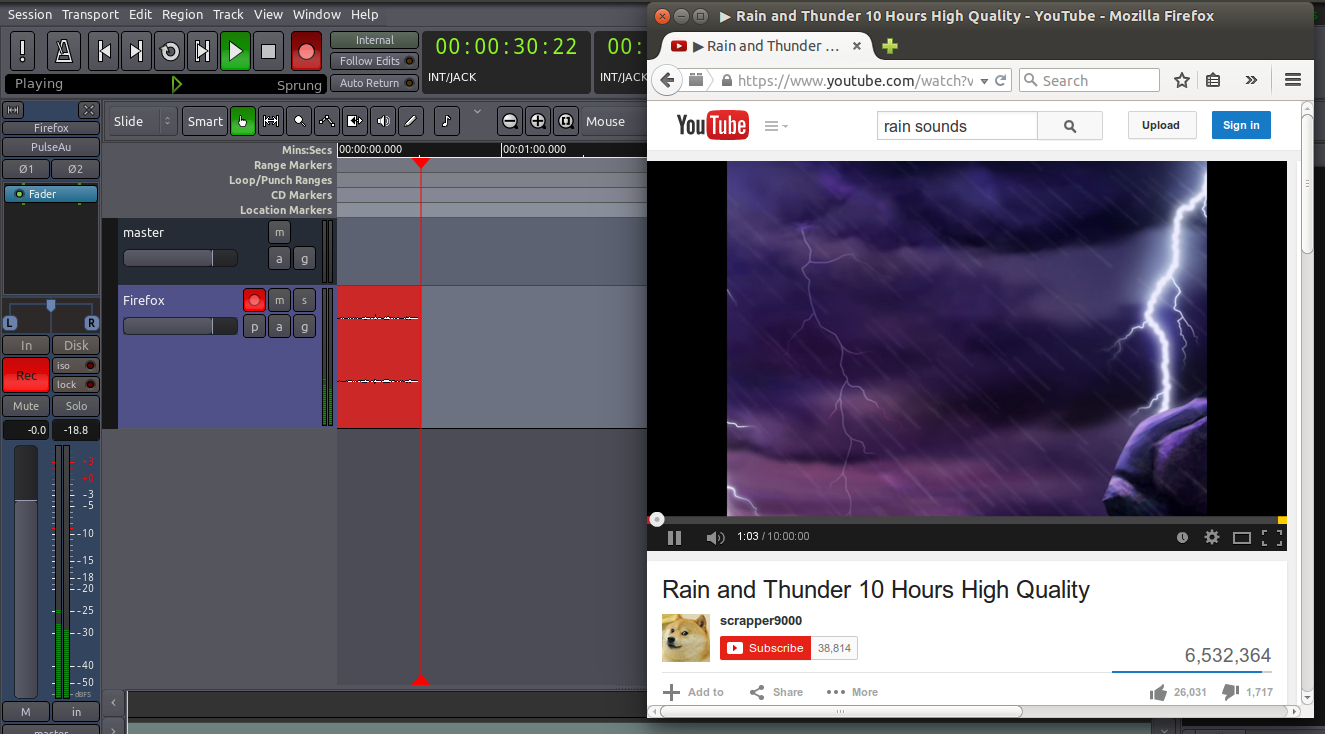
The source of this audio could be the line or microphone inputs of your audio interface, or it could even be sound originating from other applications on your computer which have been connected to Ardour via JACK. Please see the section on Routing for more details.

This section will show you how to record audio from an external source (for example, a microphone) onto a track in Ardour.

Editor Mixer Input

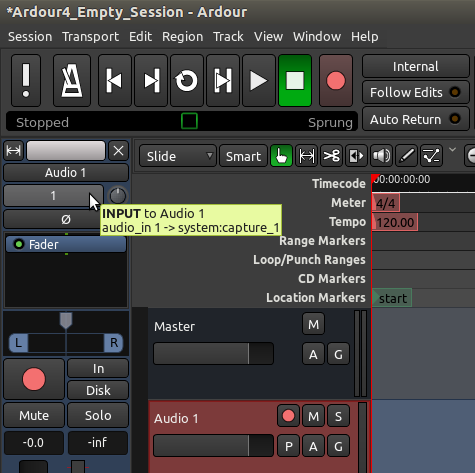
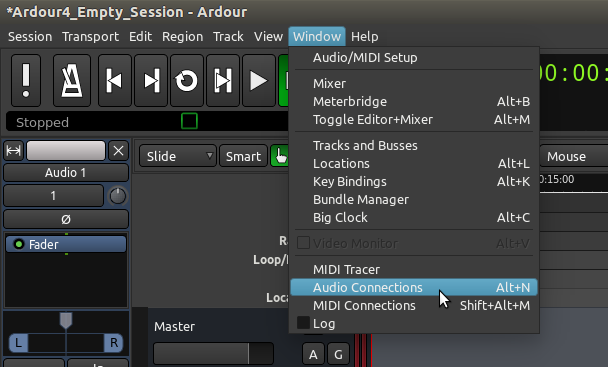
First, you should check that the proper inputs have been routed to the track you wish to record to.

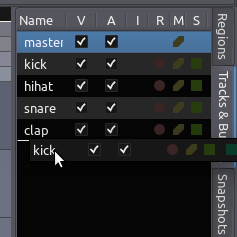
  1. Select the track by clicking on the empty space just below its name and volume slider.
  2. The Track becomes highlighted.
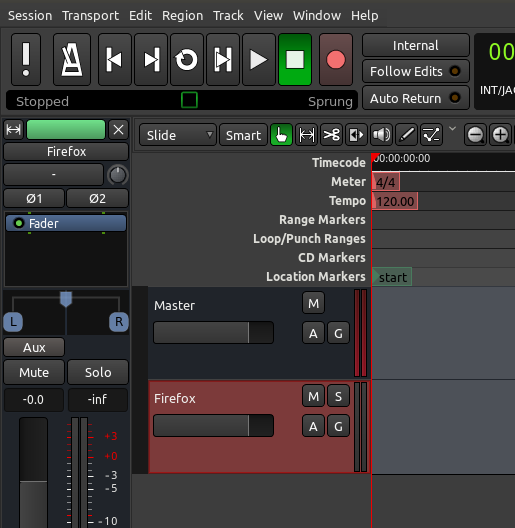
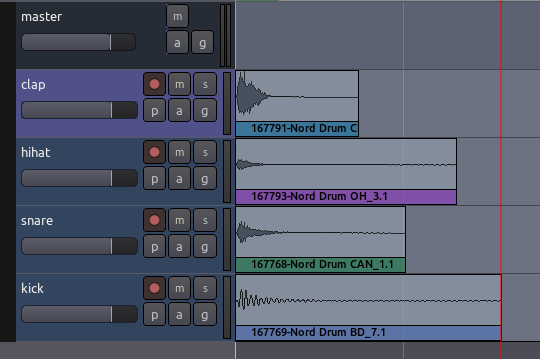
  3. The vertical strip Editor Mixer located on the left side of the Editor window should now show the Track you just selected (Audio 1 in the image above).
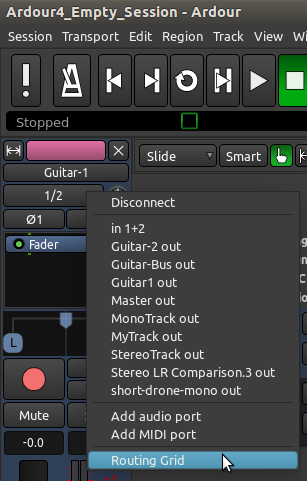
  4. Just below the Track name in the Editor Mixer you will find a button that allows you to edit the Routing.
  5. Click on that button to investigate the Routing.

TIP: If you don’t see the Editor Mixer strip, use the shortcut “Shift” + “E” to make it appear.

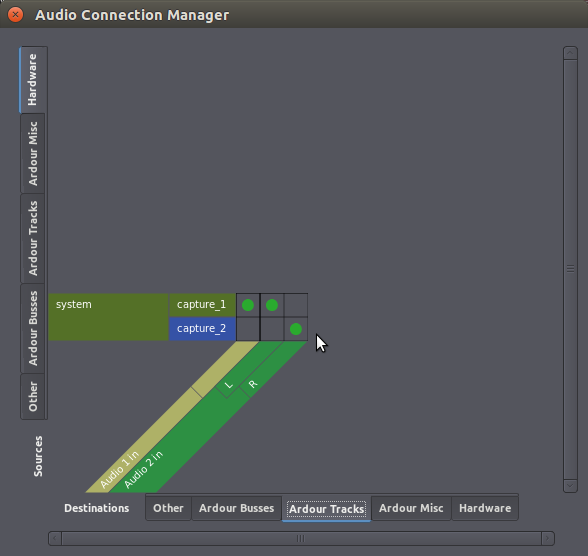
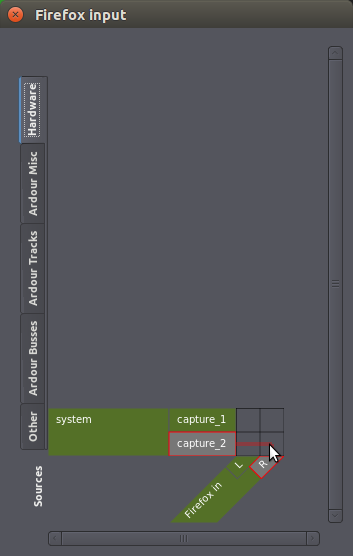
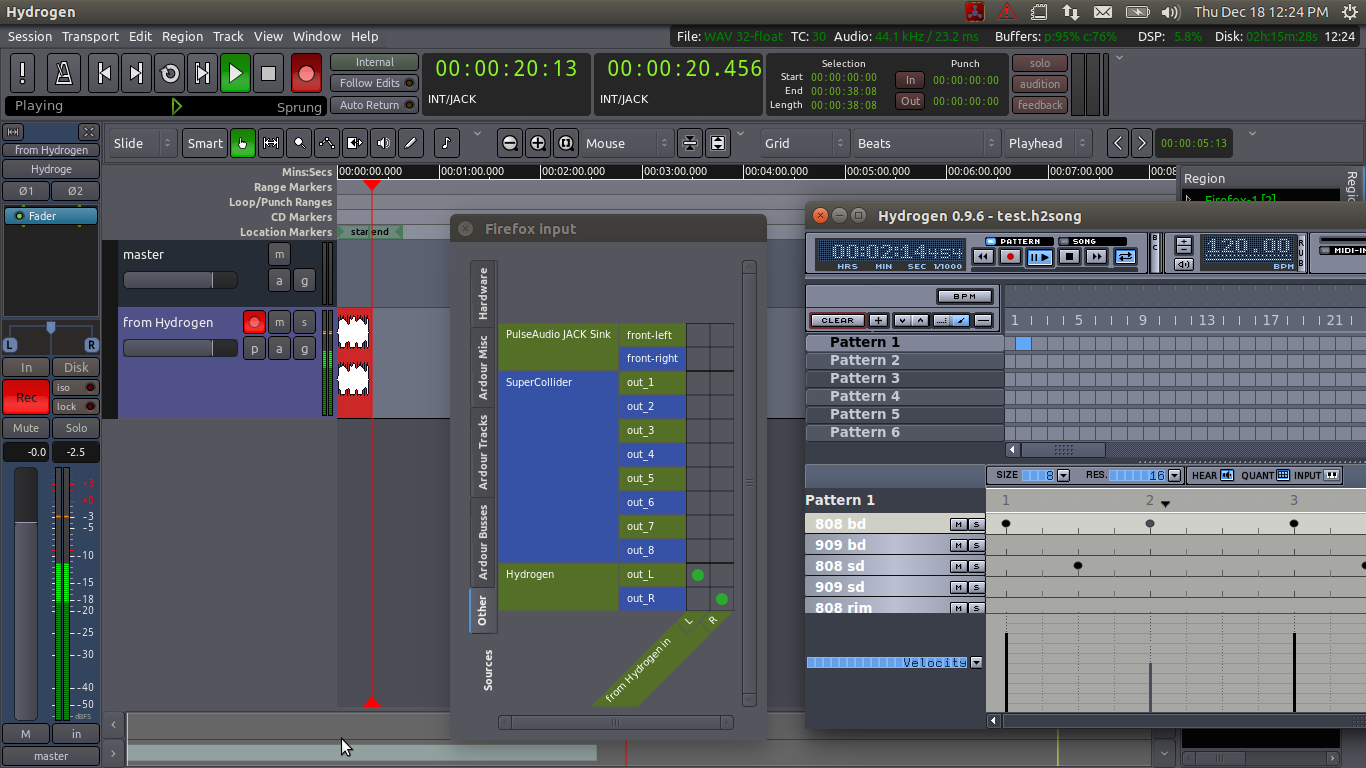
In the next image you can see that the only input of this Mono Track is receiving signal from system capture_1. This normally means the first microphone input of your soundcard. The actual names of the connections on your personal computer may be different depending on a number of factors, including whether you are using a Mac, Windows, or Linux computer. If you don’t see a connection named system capture_1, look for whichever connection name is likely to be your input microphone.

Audio 1 input 

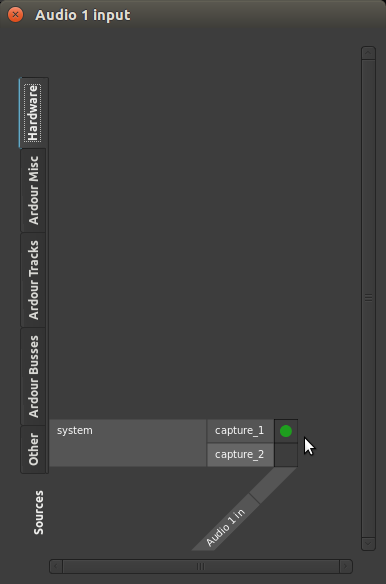
The tabs that you see displayed vertically on the left are available sources. “Audio 1 in” on the bottom right is the destination. The green dot represents a connection.

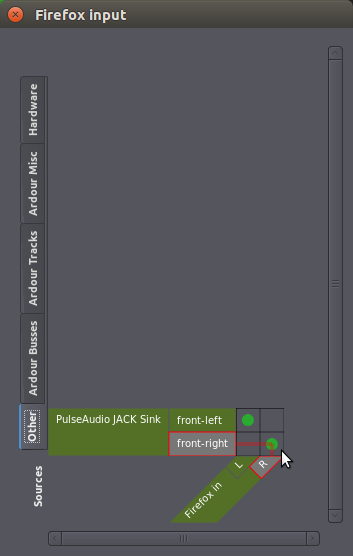
The Ardour tabs show the connections that can be made from other sources within Ardour. The Other tab displays audio connections available from software other than Ardour. The Hardware tab shows hardware connections (for example, the built-in microphone of your computer or the inputs from your sound card). This will be explained in more detail in the Understanding Routing chapter. 

For the purpose of this chapter, simply make sure that system capture_1 (or equivalent in your computer) from Hardware tab is connected to the track you want to use so that we can do a test recording. If you don’t see a green dot as in the screenshot above, click on the matrix to make the connection manually. You can now close this window.

Note: the example above assumes you are recording a Mono sound source onto a Mono Track. If you want to record in Stereo, the instructions are pretty much the same, but you should create a Stereo Track. You should then see two green dots, one for capture_1 and another for capture_2.

Arming the Track

Please be sure to first turn down the volume of your loudspeakers before the next step.

“Arming the Track” is simply to get it ready for recording. Once you have checked that the proper capture inputs have been routed to the Track, you can arm the Track to record by clicking on the small red icon on the horizontal track strip (not the big one in the Transport controls).

Arming Track 

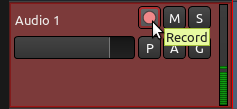
When properly armed, the small red icon will remain highlighted, and you will be able to see the incoming signal by looking at the Peak Meter on the Editor Mixer or on the horizontal Track strip.

If you are using headphones, you should be able to hear (“monitor”) the sounds being recorded. If you are using loudspeakers, be sure to turn their volume down to avoid feedback.

Note: unless you have told Ardour to do otherwise, the input being recorded will be monitored (in other words, heard) via the Audition output. If you are not using headphones to monitor the recording process, you may get some loud feedback at this point!

Arm Ardour and Start Recording

Now that you have armed the Track to record, you must arm Ardour itself to record by clicking on the big red button in the Transport menu. The button will blink in red, indicating that Ardour is ready to record. To start recording, click on the Play button in the Transport menu, or press the space bar of your computer keyboard. Clicking the Play button again (or pressing the space bar) will stop recording.

Recording

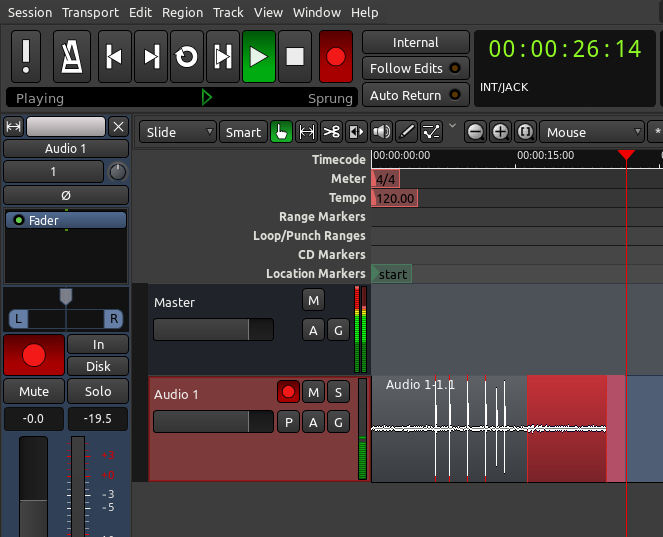
While recording, the armed Track will capture the sounds from the input. Any existing sound on other tracks will play normally during the recording. This allows you to play, sing or speak along with other Regions and Tracks you have already recorded or embedded in your Session.

While recording, you will be able to see the Levels (the amplitude in Decibels) of the incoming sound, as well as see the Peaks of the Waveform appearing as it is recorded.

Avoid Clipping

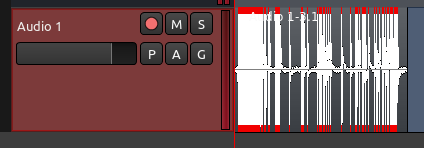
The audio in the screenshot below was recorded too loud and produced Clipping (in other words, the signal recorded was outside the bounds of what could be represented digitally), which results in a loss of information and audible distortion. The clipped peaks in the waveform are marked in red.

Clipping

The best and easiest way to avoid Clipping is have some control over the volume of the incoming audio signal before it gets to the sound card. For example, you can can move the microphone further away from the sound being recorded or use a mixer to reduce the volume of the incoming signal. 

When the audio signal has been recorded within proper limits, you should see no red Peaks, and the level meter should show a negative number as maximum peak (for example, a maximum peak of around −3.0 Decibels allows for a comfortable distance from the Clipping Point.)

The range of decibels between the region’s maximum Peak and the Clipping Point is commonly referred to as Headroom. It is common recording practice to keep approximately three to six Decibels of Headroom between the maximum of your signal and the Clipping Point, with the Clipping Point itself being represented as 0dB (zero Decibels). In other words, an audio region with a comfortable amount of Headroom would have its maximum Peaks between −6dB and −3dB.

Region List

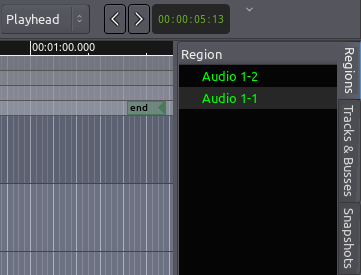
Recorded audio appears as a new Region in the recording Track. Like all Regions, this newly recorded one will be available in the Region List, from where you can drag-and-drop it into other Tracks if needed.

The Region you just recorded will automatically receive the name of the Track where it was recorded, with different takes being automatically numbered. In the screenshot below, “Audio 1-1” and “Audio 1-2” represent two different recordings made on a track named “Audio 1”.

Region List Rec

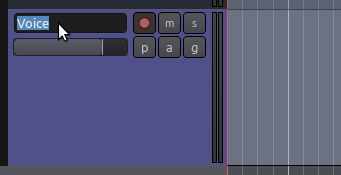
You might want to plan ahead and organize your recording Session by giving appropriate names to different tracks. For example, a Track used only for recording vocals can be named “Voice”. This way, recorded sound files will be named accordingly, and different takes will appear in the Regions List identified as “Voice-1”, “Voice-2”, etc, rather than the default generic names, such as “Audio 1”.

To rename a Track, just double-click on its name (before you arm the track to record) and type in the new name.

Rename Track

TIP: Did we mention how important it is to save your work often? Hit “Control” + “S” right now. Get in the habit of hitting “Control” + “S” every few minutes.

Continuing

At this point, you may want to skip directly ahead to the Arranging Tracks section to learn how to arrange the Regions into a composition. If you plan on doing more complicated Recording than what we have discussed here, in particular with a multichannel soundcard, or from other JACK-enabled audio programs on your computer, you should also have a look at the Understanding Routing chapter.

Next: ARRANGING TRACKS or UNDERSTANDING ROUTING

Routing an audio signal is sending it from somewhere to somewhere else.

In addition to getting audio signals to and from Ardour, routing plays an important part inside Ardour itself. Examples of using routing inside Ardour include routing audio from Tracks to the Master Bus or to other Busses, creating ‘sends’, routing the outputs from Busses to the Master Bus, etc. (see chapter on Creating a Track for an explanation of Tracks and Busses). All routing, both internal and external to Ardour, is handled by JACK.

Routing in Ardour

The standard routing of inputs, tracks and busses in Ardour is determined when a new Session is created in the Advanced Options of the New Session dialog box (see Starting a Session chapter). By default, the routing is as follows:

  • The audio device inputs are routed to the Track inputs.
  • All outputs from Tracks and Busses are routed to the master bus inputs.
  • The Master Bus outputs are routed to the audio device outputs.

Note that when a new Bus is created, nothing is routed to its input.

This routing setup makes sense for sessions containing only Tracks, but to make use of any Busses (other than the Master Bus) or to get creative with the paths of the audio signals inside Ardour, we need to be able to change the routing.

The Audio Connection Manager window (also known as the patchbay) is the main way to make connections to, from ,and within Ardour’s mixer. You can open this window with the shortcut “Alt” + “N”, or through the menu Window > Audio Connections.

Audio Connection Manager 

The patchbay presents two groups of ports; one set of sources, and one of destinations. Sources and destinations are organized by tabs. The available sources are displayed vertically on the left side, and the destinations are displayed horizontally at the bottom.

In the screenshot below, notice that the “Hardware” tab is selected on the top left (that’s a source), and the “Ardour Tracks” is selected as a destination in the bottom. This means that the matrix you see displays connections from available hardware sound sources (for example, a microphone), into existing Ardour tracks. 

ACM 1 

The green dots represent a connection. The screenshot above tells us that incoming sounds from “system: capture_1” (the first input source of your soundcard, or the built-in microphone of your laptop) are going into Ardour track named “Audio 1”, and also that incoming sounds from “system: capture_1” and “system: capture_2” are respectively going into the Left and Right inputs of Ardour track named “Audio 2.

Notice we can see that “Audio 1” is a Mono track because it only has one connection slot, while track “Audio 2” is Stereo since it has two slots (Left and Right).

The next screenshot shows the signal path from Ardour Tracks (selected vertical tab) into Ardour Busses (selected horizontal tab). As mentioned earlier, the default setting for all Ardour Tracks is that their sound goes to the Master Bus.

ACM 2

Note: remember that “Audio 1” is a Mono track? We saw it in the earlier screenshot that “Audio 1” only has one input slot. But now on the screenshot above you see that “Audio 1” has two outputs (Left and Right). This is normal: we define whether a track is Mono or Stereo by its number of inputs, not outputs. Mono tracks will hold a single channel of audio, but you can still choose to place the sound on the left or the right speaker (or anywhere in between). More on this in the chapter Panning.

Finally, let’s explore a couple more tabs in the Audio Connection Manager to see the sound going from the Master Bus to the actual hardware outputs (your loudspeakers or headphones):

ACM 3

As you can see, the selected source tab is now “Ardour Busses”, and the destination tab is “Hardware”. This session happens to have only one bus, the default “master out”. The green dots show that all sounds coming out of the Master Bus are going to system playback 1 and 2, which are the outputs of your soundcard.

How to connect and disconnect?

To make a connection, click on the desired empty square in the matrix; a green dot will appear to indicate the connection is made.

To undo a connection, simply click on an existing green dot and it will disappear.

Practical example of routing to a bus

In the following example session, there are two guitar Tracks and one unused Bus called Guitar Bus, all Stereo.

ACM 4 

Suppose you want to send the output from the two guitar Tracks to the Guitar Bus instead of the Master Bus. This can be useful to control the volume of both guitars with just one Fader (in this case the Guitar Bus fader). Then the output of the Guitar Bus, which is the sum of the two guitars, goes directly to the Master Bus.

Here is how to edit the patchbay to get the desired routing. Select “Ardour Tracks” tab from Sources (vertical tabs), and “Ardour Busses” from destinations (horizontal bottom tabs). Undo existing connections from both Tracks to Master. Then create connections from both Tracks to Guitar Bus. The final result would look like this:

ACM 5 

Now both guitar tracks are routed to the Guitar Bus, and no longer directly connected to the Master Bus. We then make sure that the Guitar Bus is, by its turn, routed to the Master Bus (the output routing of a Bus is edited in the same way as for a Track), so that we can still hear the sound from both guitar Tracks. Now we can control the volume of both guitar Tracks together by changing the Fader of the Guitar Bus. What’s more, we can now add Plugins to the Guitar Bus to process the sound of both guitar Tracks together.

Track- or Bus-specific views of the Patchbay

The Audio Connection Manager (Patchbay) that you open with “Alt” + “P” shows you the complete matrix of every single source and every single destination available in Ardour. Sometimes this is too much: you just want to quickly change the routing of a single track input or output, for example. Ardour allows you to access a relevant subset of Patchbay connections when you click directly on the Inputs or Outputs button of a Track or Bus in the Mixer Strip.

The Inputs button is at the top, and the Outputs button is on the bottom of the strip. Clicking on either one will show you a menu of connection options. In the screenshot below, for example, you would click on the “1/2” button right under the track name “Guitar-1” in order to access this menu:

Editor Mixer In Out

You may select a connection right there from the menu, or choose “Routing Grid” to see a simpler version of the Audio Connection Manager with only the Inputs or Outputs of the selected Track or Bus.

All Ardour connections are JACK connections

It is important to realize that any routings that you make or disconnect from within Ardour are in fact JACK routings, which you can see from other applications like Qjackctl, Catia, or JackPilot, depending on your Operating System. Below is an example of a Catia window (Linux only) displaying the same JACK connections discussed above:

Catia

Continuing

In this chapter, we covered how to manage Routing inside Ardour, or between Ardour and the sound card. However, one of the strengths of using the JACK system is that it can also manage connections between applications on the same computer. To gain a better understanding of how this works, please continue to the chapter Routing Between Applications. If you would prefer to work only with Ardour, then skip ahead to the section on Arranging Tracks.

Next: ROUTING BETWEEN APPLICATIONS or ARRANGING TRACKS


Sometimes you may need to record the audio output of another program into Ardour (for example, the sound of a YouTube video playing in Firefox, or the output of SuperCollider or PureData). This chapter shows how to accomplish that.

The examples on this page were created on a computer running Ubuntu Linux. Beware that things may work differently if you are on another OS (in particular if you are using a Mac, in which case you will be using JackPilot). The general principles are always the same, though.

From your browser to Ardour

Web browsers (Firefox, Chromium, etc) are not JACK-aware applications. Luckily, systems such as KXStudio and UbuntuStudio come with a bridge application between regular system audio (like PulseAudio) and JACK. This tutorial assumes you are using a computer with this bridge already running and working.

The overall steps to record audio from YouTube (or any other sound coming from your browser) into Ardour are:

  1. Create a Stereo Track in Ardour
  2. Disconnect Hardware sources from Track inputs
  3. Connect PulseAudio Jack Sink to Track inputs
  4. Start recording into the Track
  5. Start playing the YouTube video

For this example, a new session was created with a new Stereo Track named “Firefox”:

YouTube 1

Then we select the Track and click on the Inputs button on the Editor Mixer strip. In the screenshot above, it’s the button just below the track name (“Firefox”) in the Editor Mixer strip (it shows only a “-“ (dash)in the example above, meaning that there are no connections made yet). We are presented with the Patchbay window specific to that Track’s inputs.

First thing to do is to disconnect any microphone inputs from that track (“system capture”), if any. After disconnecting, this part of matrix for the “Firefox” Track should look like this (no green dots):

YT 2

Next step is to change tabs in this same window. Choose “Other” as the source. This is where you will find other running applications that can be sound sources to Ardour. On a Linux computer with PulseAudio Jack bridge, you will see “PulseAudio JACK Sink” as a source. Click on the appropriate empty squares to create connections (green dots) between “front-left” and “front-right” to the Left and Right inputs of the “Firefox” Track. It should eventually look like this:

YT 3

Now you are ready to go. Simply follow the same recording procedures explained in the Recording Audio chapter: record-enable (arm) the Track (small red circle on the track), arm Ardour to record (big red button; it starts blinking), then hit the Play button. Go back to your browser and start playing the YouTube video.

YT 4

From JACK-aware applications to Ardour

Other music software like SuperCollider, Hydrogen, and PureData are JACK-aware. This means they will show up directly as source and destination options in Ardour’s Audio Connection Manager. You don’t need to worry about any PulseAudio / Jack bridge as in the YouTube example above.

The procedure is essentially the same: create a Mono or Stereo Track to record the audio, set that Track’s inputs to the desired source, and record as usual.

Hydrogen

The screenshot above was taken while recording a drum pattern from Hydrogen directly into an Ardour track named “from Hydrogen”. Hydrogen’s window is on the right. Ardour’s Patchbay window was left open for demonstration: notice that the application “Hydrogen” shows up as a source under the “Other” tab. It is connected directly to the inputs of the track. Also notice that SuperCollider (another jack-aware application) happened to be open at the same time, though its window is not visible in this screenshot. SuperCollider provides 8 default sound outputs, all of which show up as potential sources in Ardour’s Patchbay.

Continuing

This concludes the Getting Started chapters. Now that you have some audio imported, recorded from a line or microphone input, or even from another application, proceed to the Arranging Tracks section and learn how to arrange your composition.

Next: ARRANGING TRACKS

In the following chapters we will use Ardour to create a short rhythmic passage using several drumkit samples.

We will continue working on this passage in later tutorials, such as Working with Regions and Creating Looped Sections. We assume that you have read the chapters in the Getting Started section already, and are familiar with Importing Audio, Tracks, and the Timeline.

Importing Samples

The first step is to add some sounds, which is discussed at length in the Importing Audio chapter. Here, we are using the Add existing media dialog (“Ctrl” + “I”) to import some drumkit samples as regions. The samples used in this tutorial were obtained from a sample pack from the freesound.org website (Nord Drum Mini Kit sample pack, which you can download here).

After importing a few sounds from the downloaded sample pack (bass drum, snare, hi-hat, clap), our session looks like this (in this case I used the “Add files as new tracks” option, and inserted “at session start”. The drumkit samples appear as new individual tracks in the Editor Window, each with the name of the audio file used. If the file names are too long or obscure, you may want to rename your tracks for clarity.

FS2

Organizing the Tracks

Now we rename the tracks so we can quickly see the location of each instrument (double-click on the track name to edit it).

FS3

You may also wish to rearrange the order of the tracks from top to bottom in the editor window. Do that by clicking the Tracks & Busses tab at the far right of the Editor Window and drag-and-dropping the tracks in the order you want.

FS4

Tip: you can also use the V check boxes in this tab to view or hide Tracks in the Main Canvas.

Here we have ordered the drumkit so that the kick drum is on the bottom, the snare and high hat are in the middle, and the clap is on top. 

FS6

Continuing

In the next step we will learn about Setting Up the Meter to organize these samples into a rhythm.

Next: SETTING UP THE METER

The Meter determines the musical speed of the passage we are composing, as measured in Beats Per Minute.

If we are composing something rhythmic, it will also determine the lengths of the sound samples we use to some extent. So it is important to be able to set up the Meter before we continue.

To see the meter-related timelines for our session, we can right-click anywhere in the “header” of the Rulers and check the following options: Meter, Bars & Beats, and Tempo.

Meter

It is possible to set a Meter and Tempo for the entire Ardour session, as well as to change them at different points in the same session.

To change the Tempo and Meter (time signature) for the entire session, use the corresponding buttons located underneath the secondary clock:

Tempo_and_Meter

For the Tempo (button on the left), choose the number of BPM (Beats Per Minute) for your session.

For the Meter (button on the right; the letters “TS” on the button mean “Time Signature”), you can enter new values for the Beats Per Bar as well as the Note Value. Click “Apply” to apply the changes globally to your session.

If the Meter or Tempo of your session changes later in the song or composition, simply add a new marker by right-clicking in the Meter or Tempo timeline and selecting New Tempo or New Meter and entering the new Tempo or Meter in the resulting dialog.

Continuing

Next, we will explore Using Ranges to set up a loop we can listen to while we arrange the rhythm.

Next: USING RANGES